
DIY Marbled Flower Pot Tutorial (Easy + Budget-Friendly Painted Planters)
Learn how to make a DIY marbled flower pot using simple supplies like nail polish and terra cotta pots. This easy planter craft is beginner-friendly, affordable, and perfect for indoor or outdoor decor.
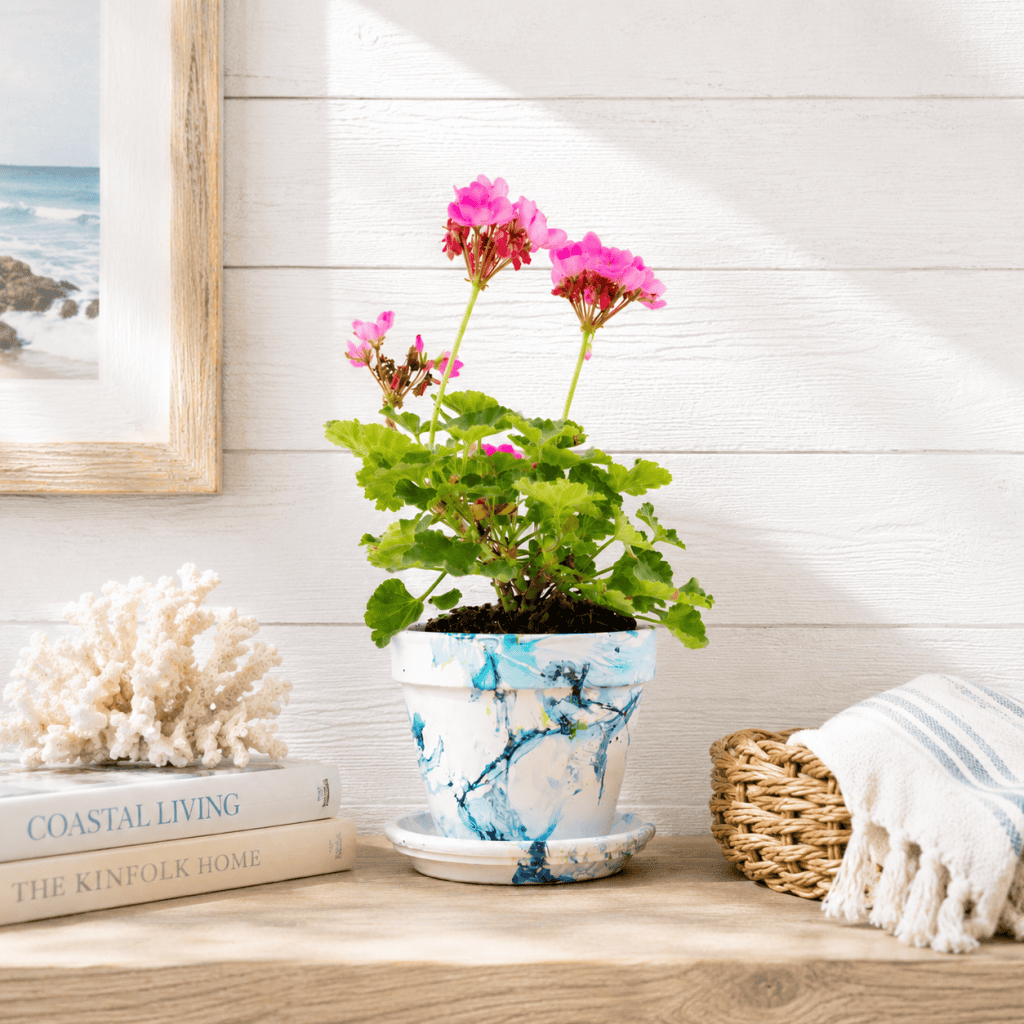
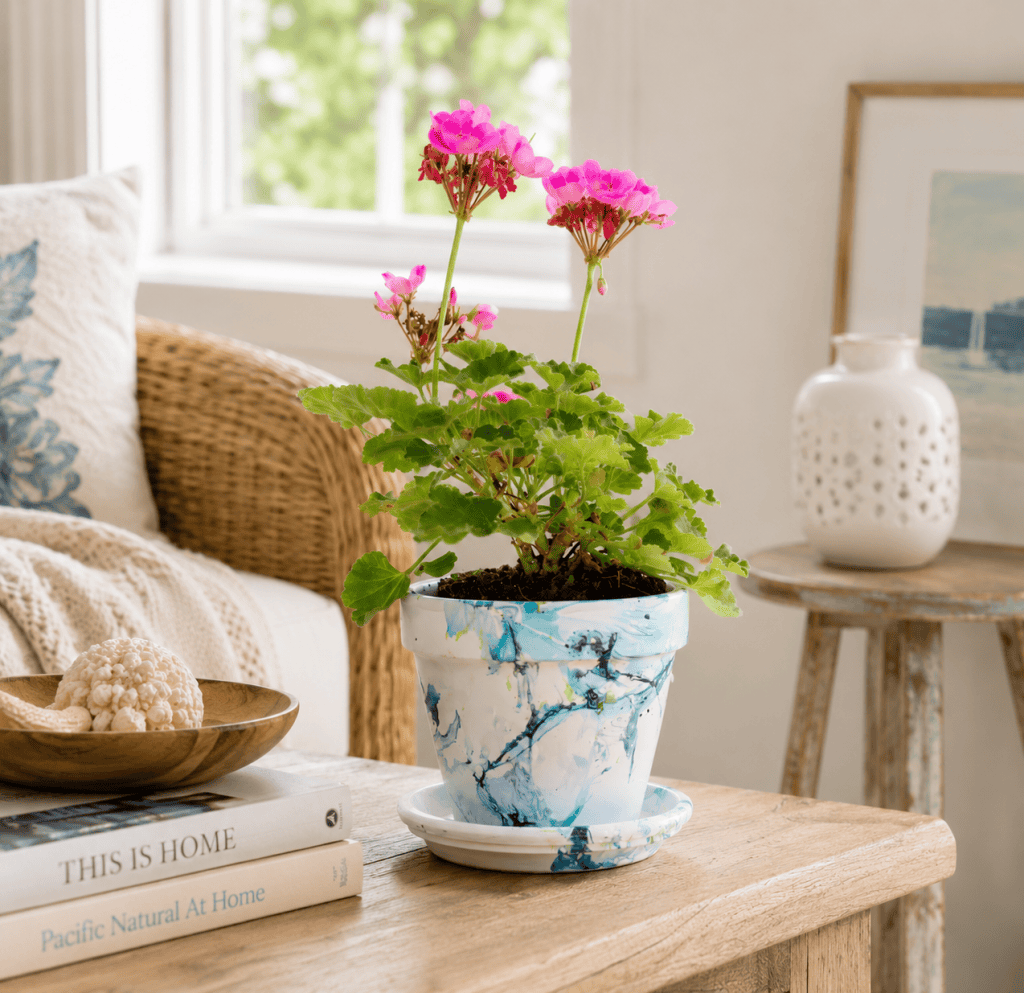
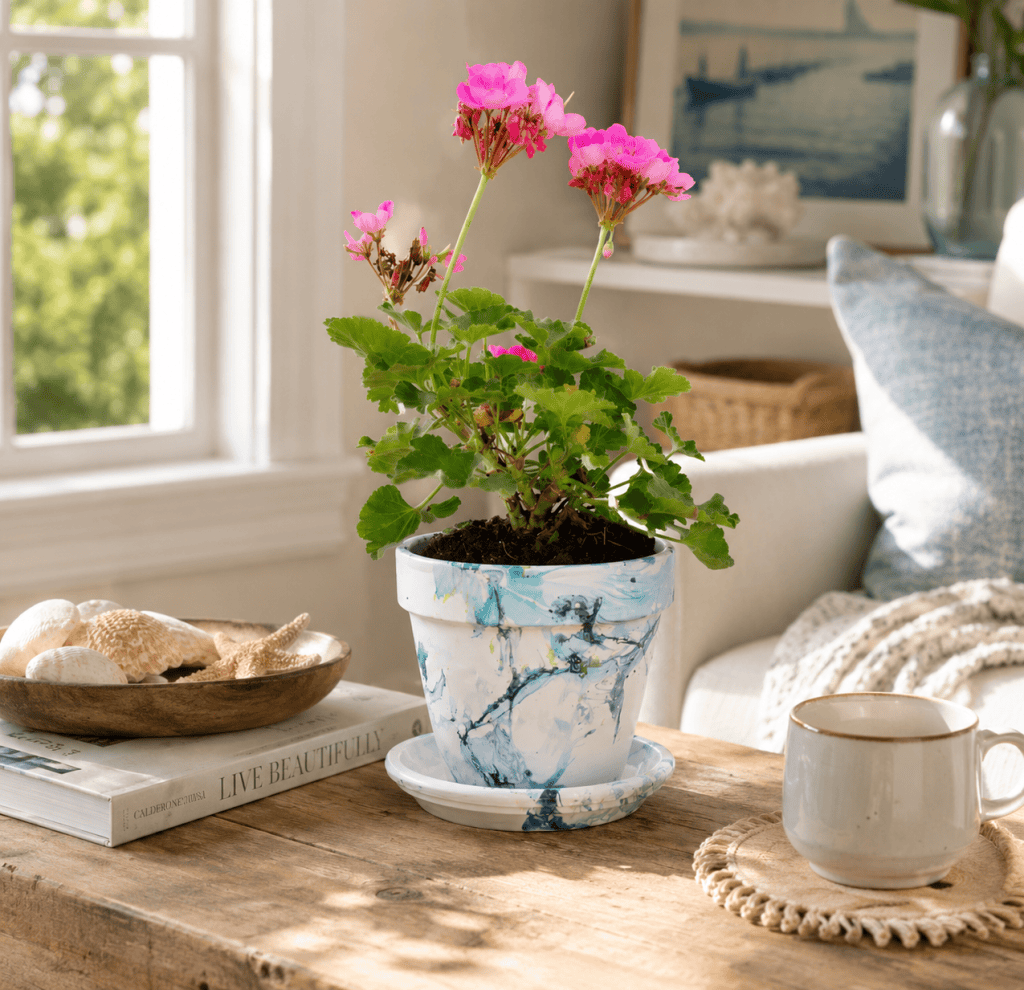
If you’re looking for an easy DIY project that instantly makes inexpensive planters look stylish and high-end, these DIY marbled flower pots are such a fun craft to try. Using simple terra cotta pots and a marbling technique with nail polish, you can create beautiful one-of-a-kind planters in just minutes.
The best part? No two flower pots turn out exactly the same. The swirling marble effect gives each planter a modern, artistic look that works beautifully with houseplants, herbs, succulents, or even faux greenery.
This beginner-friendly project is inexpensive, relaxing to make, and perfect for spring and summer decorating. Whether you’re refreshing your patio, decorating a windowsill, or creating handmade gifts, these marbled flower pots add a colorful custom touch to any space.
The marbling process works by floating nail polish on top of water and dipping the flower pot into the design. The polish naturally creates organic swirls and patterns that mimic the look of real marble. Many DIY tutorials use this same technique because it’s fast, easy, and produces gorgeous results.
Why You’ll Love This DIY Flower Pot Craft
These marbled flower pots are one of those crafts that look far more complicated than they actually are. They’re simple enough for beginners but stylish enough to look boutique-worthy.
A few reasons to love this project:
Budget-friendly craft idea
Great for beginner DIYers
Easy to customize with colors
Perfect for indoor or outdoor decor
Makes thoughtful handmade gifts
Quick weekend craft project
Fun to make with kids or teens
Every planter turns out unique
They also pair beautifully with modern, boho, coastal, or colorful home decor styles.
Outdoor DIY Planter Ideas You May Also Like
Looking for more creative outdoor projects? These DIY planter ideas are perfect for adding personality to your porch, patio, deck, or garden space. From painted pots to outdoor decor projects, these beginner-friendly tutorials make it easy to refresh your outdoor spaces on a budget.
DIY Cedar Window Boxes: Easy Custom Planters That Make Your House Look Instantly Prettier
DIY Trellis (Easy, Budget-Friendly Garden Upgrade That Looks Expensive)
How to Whitewash Terra Cotta Pots
How to Build an Easy Birdhouse Planter
Easy Raised Vegetable Garden with Pea Gravel (Simple DIY for a Clean, Modern Backyard)
DIY Privacy Screen Planter That Actually Works (Full Backyard Privacy on a Budget)
DIY Marbled Flower Pot Tutorial (Easy + Budget-Friendly Painted Planters)
(As an Amazon associate, I earn from qualifying purchases)
Supplies You’ll Need
To make these DIY marbled flower pots, you’ll need:
Terra cotta flower pots
White acrylic paint
Paintbrush
Nail polish in 2–4 colors
Large disposable container or bowl
Toothpicks or skewers
Paper towels
Disposable gloves
Small terra cotta pots work especially well for this project, but you can use larger pots too.
[Tip– Work fast! The nail polish will get a goopy, plastic texture after a few minutes. If you’re dipping multiple items it’s best to add new drops of polish]
Step 1: Paint the Flower Pots
Start by painting your terra cotta pots with white acrylic paint.
This creates a bright base coat that helps the marble colors stand out more vividly. Most terra cotta pots only need 1–2 coats of paint.
Allow the paint to dry completely before moving on to the marbling process.
You can:
Paint only the outside
Paint the rim and upper interior
Fully paint the inside and outside
If your pots will hold real plants, painting only the outside is usually easiest.
Step 2: Prepare Your Water Container
Fill a disposable bowl or container with warm water.
The water should be deep enough to dip the flower pot into. Warm water works best because cold water can cause the nail polish to harden too quickly.
Be sure to work in a well-ventilated area since nail polish fumes can become strong.
Lay down paper towels nearby so you have a place for the pots to dry.
Step 3: Add the Nail Polish
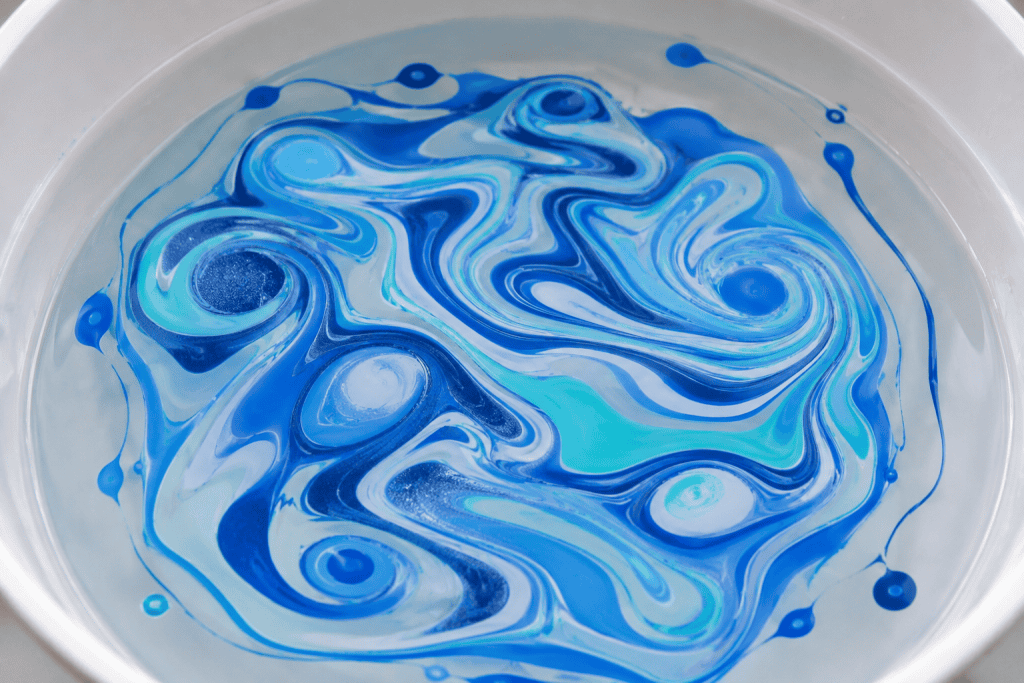
Open your nail polish colors and drizzle them onto the surface of the water one at a time.
The polish should float on top of the water rather than sink. Pour slowly and work fairly quickly.
Once the colors are floating, use a toothpick or skewer to gently swirl them together into a marble pattern.
Avoid overmixing the colors or the design can become muddy.
The swirling step is what creates those soft marble-like veins and movement in the final design.
Step 4: Dip the Flower Pot
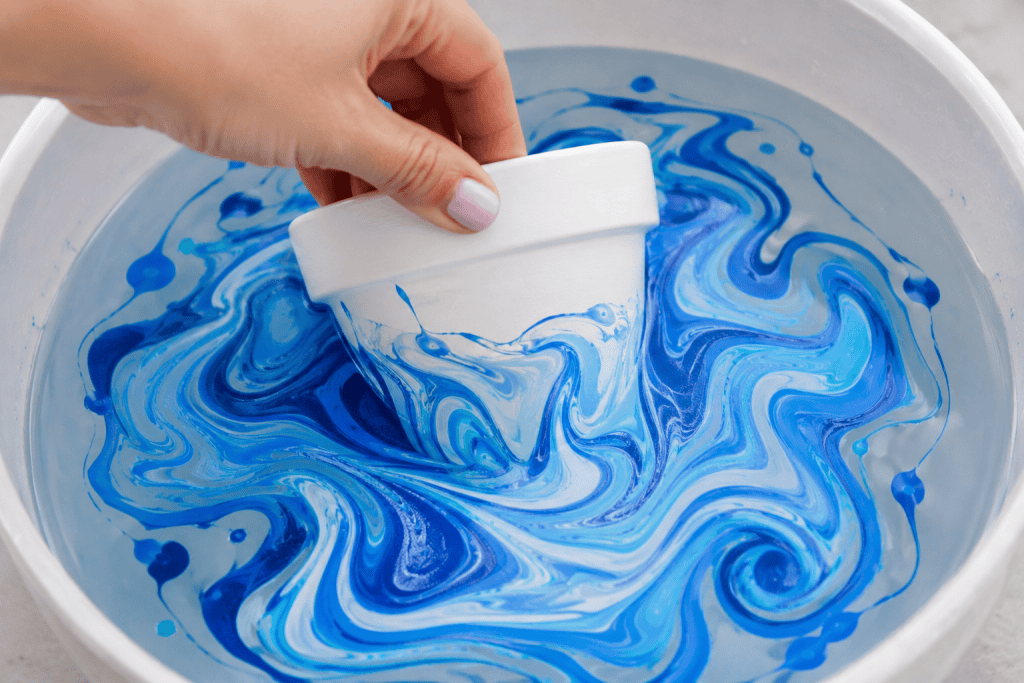
Holding the rim of the flower pot, slowly dip it into the water.
Rotate the pot gently as you dip so the marble pattern wraps around the surface evenly.
As soon as you lift the pot from the water, you’ll see the marbled effect appear instantly.
Set the pot upside down on paper towels to dry.
The process is surprisingly fast and satisfying.
Step 5: Let the Pots Dry
Allow the marbled flower pots to dry completely before handling them too much.
Most pots dry fairly quickly, but it’s best to leave them alone for at least 30–60 minutes. Some tutorials recommend letting them dry overnight to fully cure.
Once dry, spray the pots with a clear acrylic sealer to help protect the finish.
This is especially important if you plan to use them outdoors.
Tips for the Best Marble Effect
If this is your first time trying water marbling, these tips can help make the process easier:
Use Warm Water
Warm water keeps the polish workable longer.
Work Quickly
Nail polish dries fast once it hits the water surface.
Use Thin Nail Polish
Older polish can become clumpy and difficult to swirl.
Don’t Overmix
A few gentle swirls create the prettiest marble effect.
Practice First
Try the technique on smaller pots before moving to larger planters.
Seal the Finished Pots
Acrylic sealer helps protect the design from scratches and moisture.
Decorating Ideas for DIY Marbled Flower Pot
These DIY marbled flower pots look beautiful all around the home.
Here are a few ways to style them:
Plant herbs in the kitchen
Create a succulent arrangement
Use them for patio decor
Add faux plants for easy decorating
Fill with flowers for spring centerpieces
Use as handmade gifts
Display on shelves or windowsills
Create matching sets in coordinating colors
They’re also adorable for party decor, bridal showers, or handmade teacher gifts.
Best Plants for Small Flower Pots
Smaller marbled pots work beautifully for compact plants.
Some great options include:
Succulents
Mini cacti
Herbs
Pothos cuttings
Snake plants
Ivy
Air plants
Faux greenery
Using low-maintenance plants makes these planters even easier to enjoy.
DIY Crafts You May Also Like
If you love easy home decor projects, you might also enjoy these ideas:
DIY Floral Party Backdrop for Under $15 (Easy Budget-Friendly Party Decor)
10 Summer Crafts for Your Home and Closet (Easy DIY Projects You’ll Actually Use)
Raffia Pom Pom Sandals DIY (Easy Summer Sandals You Can Make in Under an Hour)
DIY Fabric Transfer Tea Towels (Easy Custom Kitchen Towel Tutorial)
DIY Macrame Plant Hanger (Easy Beginner-Friendly Hanging Planter You Can Make in an Afternoon)
How to Make Container Candles (Easy DIY Soy Candles for Beginners)
How to Make Custom Flower Pots With Cricut (Easy DIY Gift Idea for Beginners)
DIY Framed Macrame Wall Art (Easy Boho Wall Decor You Can Make in an Afternoon)
DIY Butterfly Wreath (Easy Spring Wreath That Looks Store-Bought)
Frequently Asked Questions about DIY Marbled Flower Pot
Can you use acrylic paint instead of nail polish?
Traditional water marbling usually works best with nail polish because it floats on water naturally. Acrylic paint typically sinks or disperses differently unless mixed with special pouring mediums.
Do marbled flower pots work outdoors?
Yes, but sealing them is important. Use a clear outdoor-safe acrylic sealer to help protect the finish from moisture and sunlight.
What kind of pots work best?
Terra cotta pots are ideal because the surface helps the marbling adhere nicely. Ceramic pots can work too.
Why did my nail polish clump?
This usually happens if:
The water is too cold
The polish is too old
You waited too long before dipping
Warm water and fresh polish generally work best.
Can kids make this craft?
Yes, older kids and teens usually love this project. Adult supervision is helpful because of the nail polish fumes and materials.
These DIY marbled flower pots are such a simple way to transform inexpensive terra cotta pots into colorful custom decor. The swirling marble finish looks artistic and modern, yet the process is easy enough for beginners.
Whether you use bold colors, soft neutrals, or metallic accents, every flower pot becomes a one-of-a-kind piece. This is the perfect weekend craft for adding personality to your indoor plants, patio, or garden decor without spending a lot of money.
Once you make one, it’s hard to stop experimenting with different color combinations and marble patterns.
✨ I’d love to see what you’re making! ✨
If you’ve tried one of my knitting patterns, crochet projects, DIYs, or recipes, share your finished project on Instagram and tag me so I can see it 💛
There’s nothing better than seeing your creations come to life—from cozy knits to delicious recipes and everything in between. It truly makes my day!
Tag me @ginamicheleny so I can share your work and cheer you on!