DIY Floral Party Backdrop for Under $15 (Easy Budget-Friendly Party Decor)
Learn how to make a DIY floral party backdrop for under $15 with this easy tutorial. Perfect for birthdays, bridal showers, baby showers, photo booths, and budget-friendly party decor.

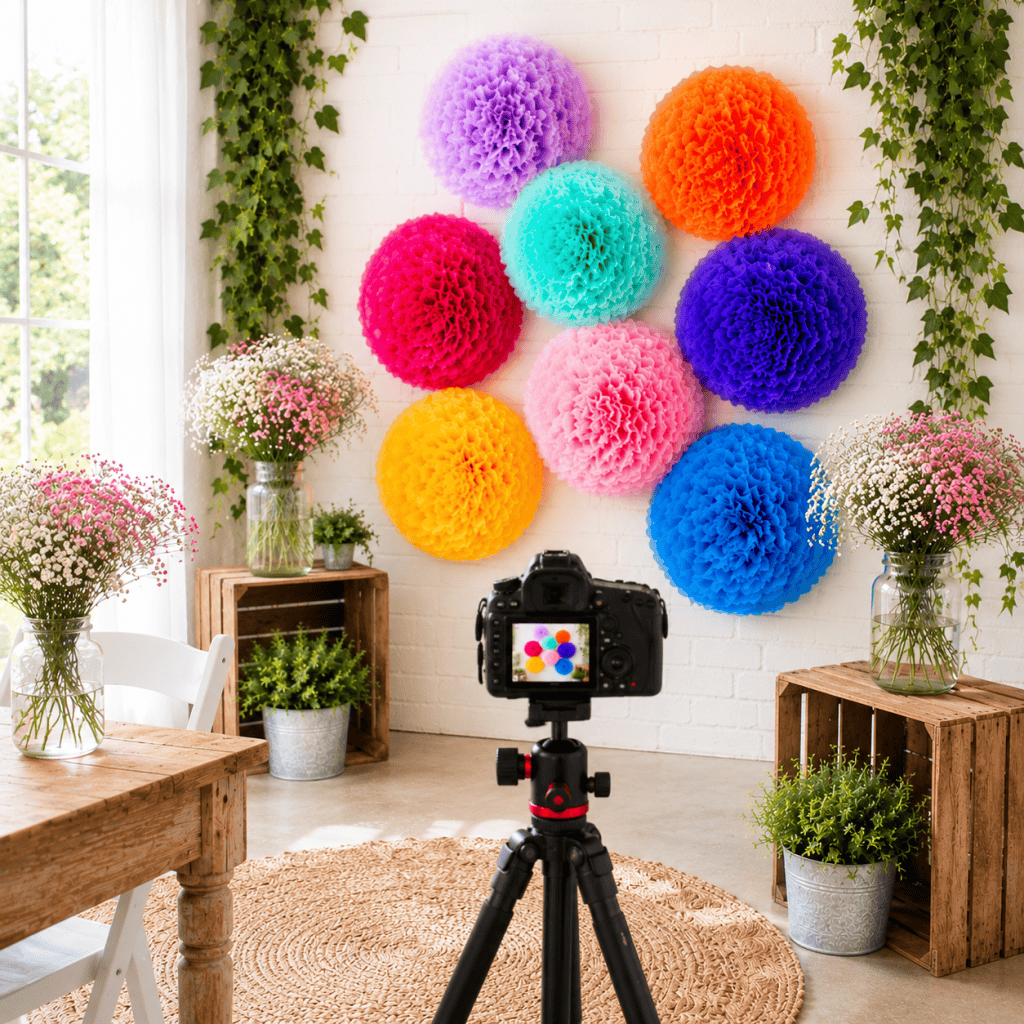
Looking for an easy and affordable way to create a beautiful party backdrop? This DIY floral party backdrop is a simple budget-friendly decorating idea that instantly transforms any space for birthdays, baby showers, bridal showers, weddings, and celebrations. Using inexpensive supplies and faux flowers, you can create a stunning floral backdrop for under $15 that looks perfect in photos and adds a fun statement piece to your party setup.
Whether you’re planning a backyard celebration, indoor birthday party, or elegant shower, this floral backdrop DIY is beginner-friendly, easy to customize, and surprisingly quick to make. It’s also a great option for creating a DIY photo booth backdrop without spending a fortune on party decor.
If you love affordable DIY party ideas that look high-end, this easy floral wall backdrop is a must-try project.
Looking for free knitting patterns? Browse this full collection of easy knitting patterns you can start today:
50 Free Knitting Patterns You’ll Actually Want to Make (Beginner-Friendly)
10 Easy Baby Knitting Patterns for Beginners
10 Quick Summer Knitting Patterns
15 Easiest Free Knitting Patterns
15 Easy Summer Knitting Patterns You Can Make This Weekend
10 Easy Baby Knitting Patterns That Look Impressive (But Are Actually Beginner-Friendly)
Easy DIY Party Decor You Can Make on a Budget
One of the best things about this DIY floral backdrop is how versatile it is. You can customize the flower colors, backdrop size, and overall style to match almost any event theme.
This easy party backdrop works beautifully for:
Birthday parties
Baby showers
Bridal showers
Weddings
Graduation parties
Tea parties
Spring celebrations
Photo booth backdrops
Dessert table backdrops
Because faux flowers are lightweight and inexpensive, you can create a dramatic statement wall without expensive event decor or custom installations.
Why You’ll Love This DIY Floral Backdrop
Great for indoor or outdoor parties
Budget-friendly party decor
Costs under $15 to make
Beginner-friendly DIY project
Perfect for photos and parties
Easy to customize for any theme
Lightweight and simple to hang
Looking for More Easy Home Decor Crafts?
DIY Macrame Plant Hanger (Easy Beginner-Friendly Hanging Planter You Can Make in an Afternoon)
How to Make Container Candles (Easy DIY Soy Candles for Beginners)
How to Make Custom Flower Pots With Cricut (Easy DIY Gift Idea for Beginners)
DIY Framed Macrame Wall Art (Easy Boho Wall Decor You Can Make in an Afternoon)
Scrap Busting Tassel Pillow Knitting Pattern (Easy Beginner Knit Pillow You Can Make with Leftover Yarn)
How to Sew an Envelope Pillow Cover (Easy Beginner Tutorial + No Zipper Needed)
DIY Cedar Window Boxes: Easy Custom Planters That Make Your House Look Instantly Prettier
DIY Trellis (Easy, Budget-Friendly Garden Upgrade That Looks Expensive)
DIY Floral Party Backdrop for Under $15 (Easy Budget-Friendly Party Decor)
(As an Amazon associate, I earn from qualifying purchases)
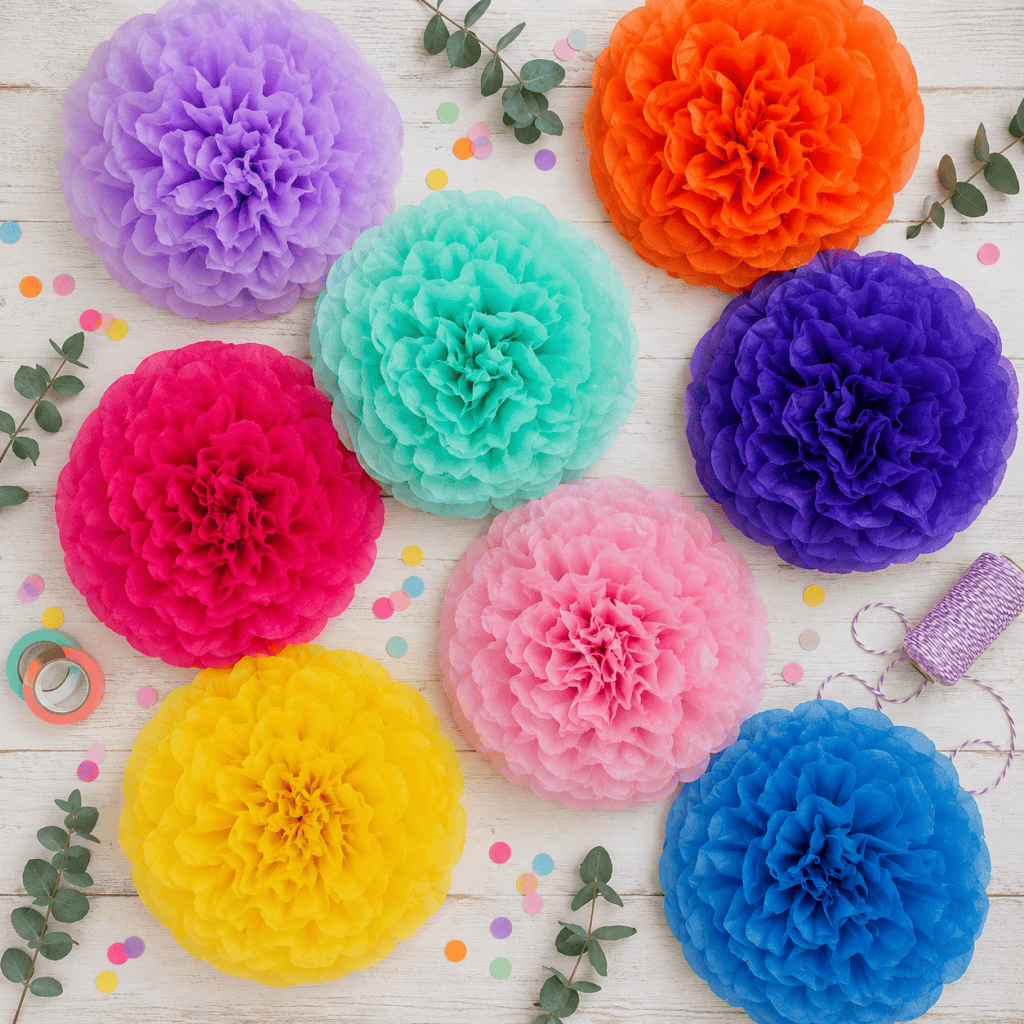
Supplies needed
Tissue Paper (5 sheets for each flower)
Pipe cleaners
Strips of fabric (an old sheet works great!) or crepe paper
Command Hooks (for hanging)

Place 5 sheets of tissue paper on top of each other. Starting at the shorter side, fold like a fan (back and forth). Make your pleats approximately 1 inch wide.

Cut both the short sides in a wavy shape.

Secure the middle with a pipe cleaner.

(Gently) Pull the top sheet up and towards the middle.

Repeat on the other side

Lift the next sheet up and bring it towards the middle. Repeat until you reach the bottom sheet.

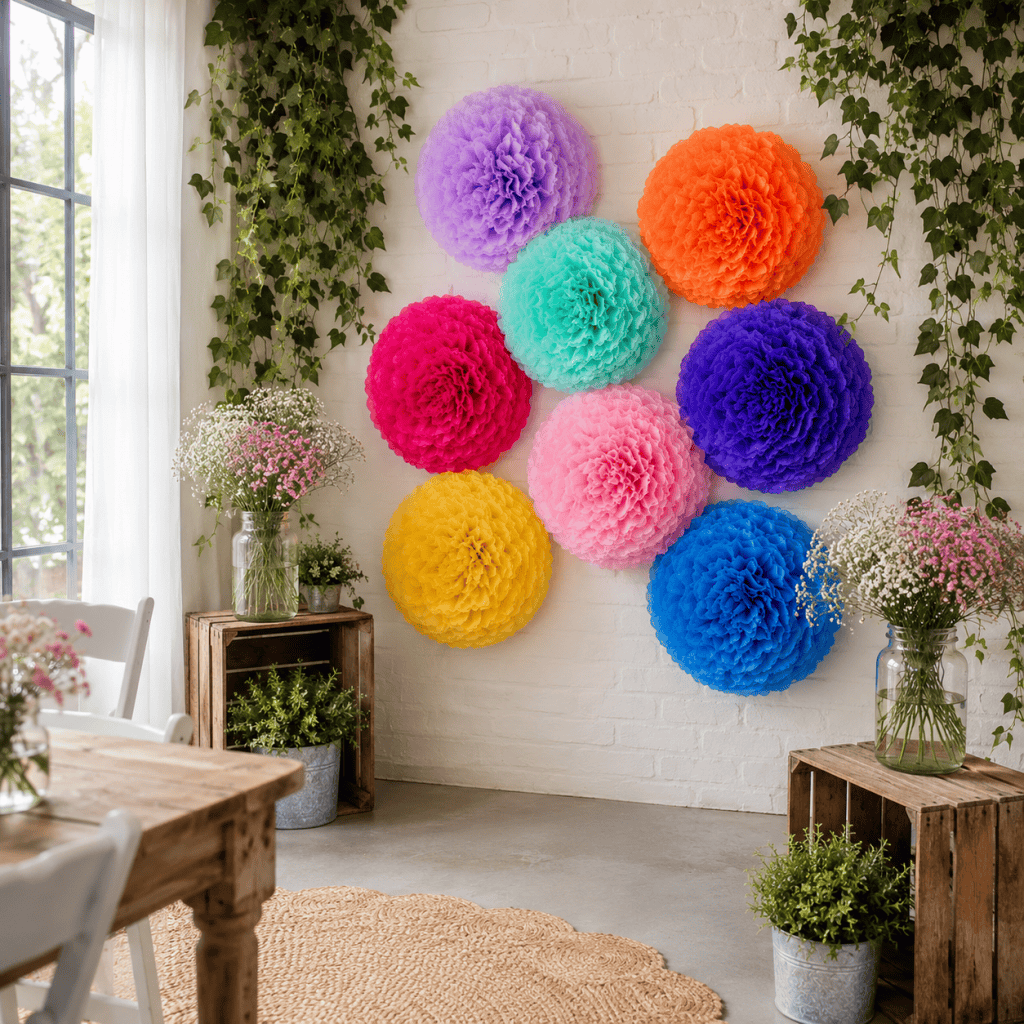
Take the end of your fabric and make a knot around the Command Hook.

Twist the flower on to the fabric strip. Attach the flowers one on top of the other.
This helps create a layered party setup that photographs beautifully.
Tips for the Best Tissue Paper Flower Backdrop
Use Multiple Flower Sizes
A mix of large and small flowers creates more visual depth and texture.
Stick to a Color Palette
Using coordinated colors helps the backdrop look polished and intentional.
Don’t Flatten the Flowers
Fluffing the tissue paper layers fully makes the flowers look larger and more dimensional.
Space Flowers Evenly
Avoid clustering all the flowers too closely together in one area.
Best Occasions for a Floral Party Backdrop
This DIY tissue paper flower wall is perfect for:
Birthday parties
Bridal showers
Baby showers
Weddings
Graduation celebrations
Tea parties
Mother’s Day brunches
Spring parties
Summer celebrations
It also works beautifully as:
a dessert table backdrop
DIY photo booth wall
party entrance decoration
nursery wall decor
Fun Color Themes to Try
Soft Pastel Party Backdrop
Perfect for baby showers and spring parties.
Bright Summer Floral Wall
Use bold pink, coral, yellow, and orange tissue paper flowers for a cheerful summer look.
Neutral Boho Backdrop
Stick with cream, blush, and beige flowers for a modern boho style.
Rainbow Party Backdrop
Mix bright colorful flowers for birthdays and playful celebrations.
Common Mistakes to Avoid
Using Tissue Paper That’s Too Thin
Very thin tissue paper may tear easily when fluffing the flowers.
Not Making Enough Flowers
A fuller backdrop usually looks more dramatic and balanced.
Hanging Flowers Too Close Together
Spacing helps each flower stand out individually.
Forgetting to Fluff the Layers
Fully separating the tissue paper layers creates fuller more realistic flowers.
Budget-Friendly Party Decorating Tips
One of the easiest ways to decorate a party on a budget is by focusing on one dramatic statement piece instead of buying large amounts of small decorations.
This tissue paper flower backdrop:
creates a huge visual impact
photographs beautifully
works for multiple party themes
costs very little to make
Pair it with:
simple table decor
balloons
candles
string lights
cake stands
for an affordable but polished party setup.
More Easy DIY Party Ideas
If you love creative party decor projects, you may also enjoy:
Healthy Homemade Bomb Pops (Easy Red White and Blue Popsicles)
DIY Fabric Transfer Tea Towels (Easy Custom Kitchen Towel Tutorial)
DIY Giant Tissue Paper Flowers (Easy Party Decor That Looks Expensive)
DIY Butterfly Wreath (Easy Spring Wreath That Looks Store-Bought)
You can find more DIY party inspiration at Gina Michele.
Frequently Asked Questions about DIY Floral Party Backdrop
How much does it cost to make a tissue paper flower backdrop?
This DIY floral backdrop can easily be made for under $15 depending on the size and number of flowers you create.
Are tissue paper flowers easy to make?
Yes. Tissue paper flowers are beginner-friendly and surprisingly easy once you learn the basic folding technique.
How do you hang tissue paper flowers on a wall?
Tape, removable adhesive strips, or Command hooks work well for attaching tissue paper flowers to walls.
Can I reuse tissue paper flowers?
Yes. If stored carefully, tissue paper flowers can often be reused for future parties and decorations.
What events work best for a floral backdrop?
These backdrops are perfect for birthdays, baby showers, bridal showers, weddings, tea parties, and photo booth setups.
What colors work best?
Pastels, bright florals, neutral boho tones, and rainbow combinations all work beautifully depending on the party theme.
This DIY floral party backdrop is such an easy and affordable way to create beautiful party decor using handmade tissue paper flowers. With just a few inexpensive supplies, you can create a dramatic flower wall perfect for birthdays, baby showers, bridal showers, weddings, and photo booth backdrops.
Whether you choose soft pastel flowers or bright colorful blooms, this easy tissue paper flower backdrop instantly adds a fun handmade touch to any celebration. Best of all, it’s budget-friendly, beginner-friendly, and completely customizable for your party style.
✨ I’d love to see what you’re making! ✨
If you’ve tried one of my knitting patterns, crochet projects, DIYs, or recipes, share your finished project on Instagram and tag me so I can see it 💛
There’s nothing better than seeing your creations come to life—from cozy knits to delicious recipes and everything in between. It truly makes my day!
Tag me @ginamicheleny so I can share your work and cheer you on!
Happy making!