How to Make Macrame Feathers (Easy DIY Macrame Feather Tutorial for Beginners)
Learn how to make macrame feathers with this easy step-by-step tutorial. Perfect for wall hangings, gift toppers, nursery decor, and other beginner-friendly macrame projects.
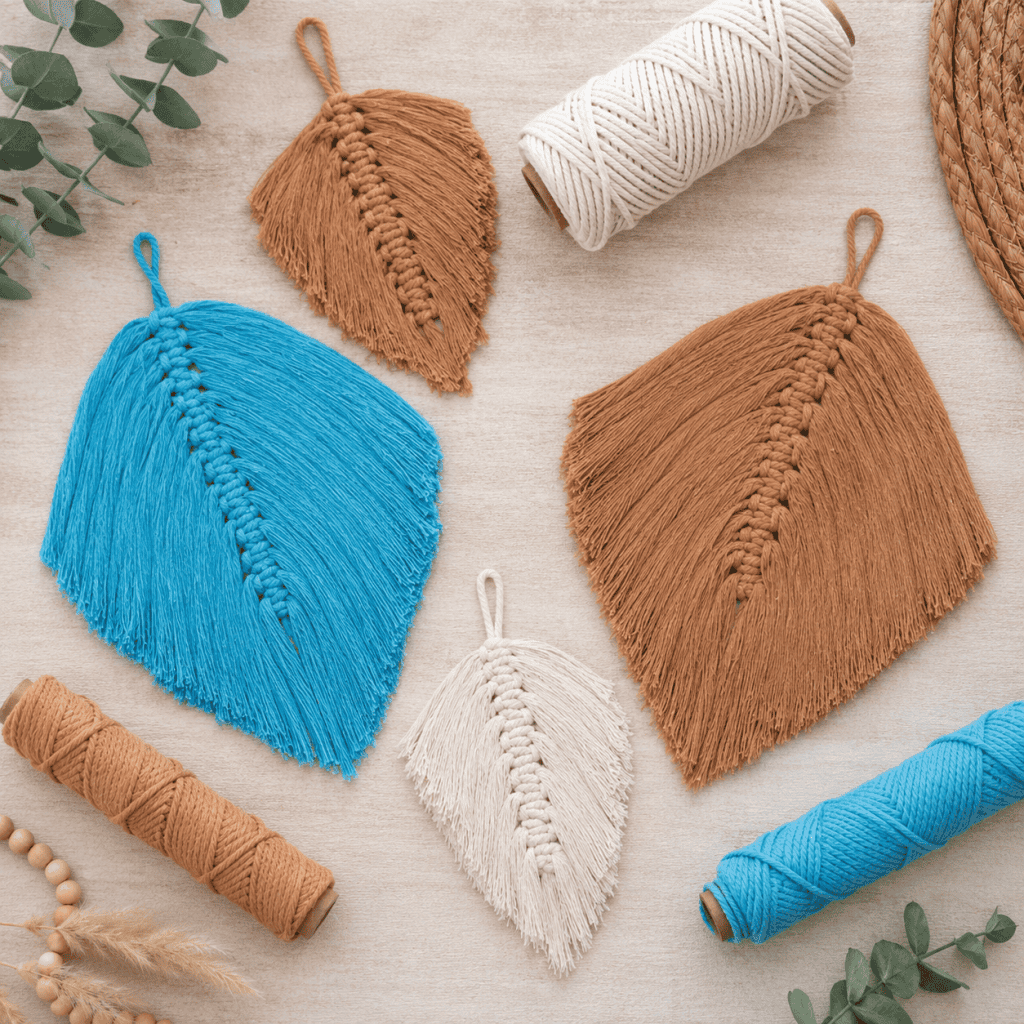
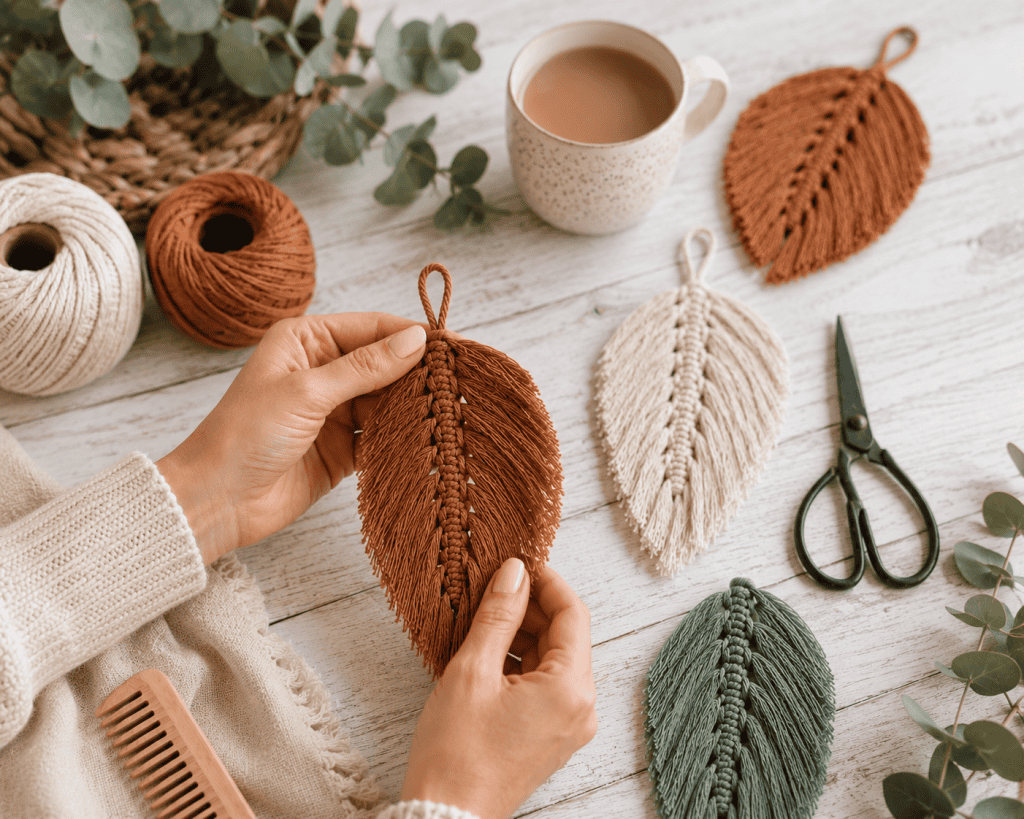
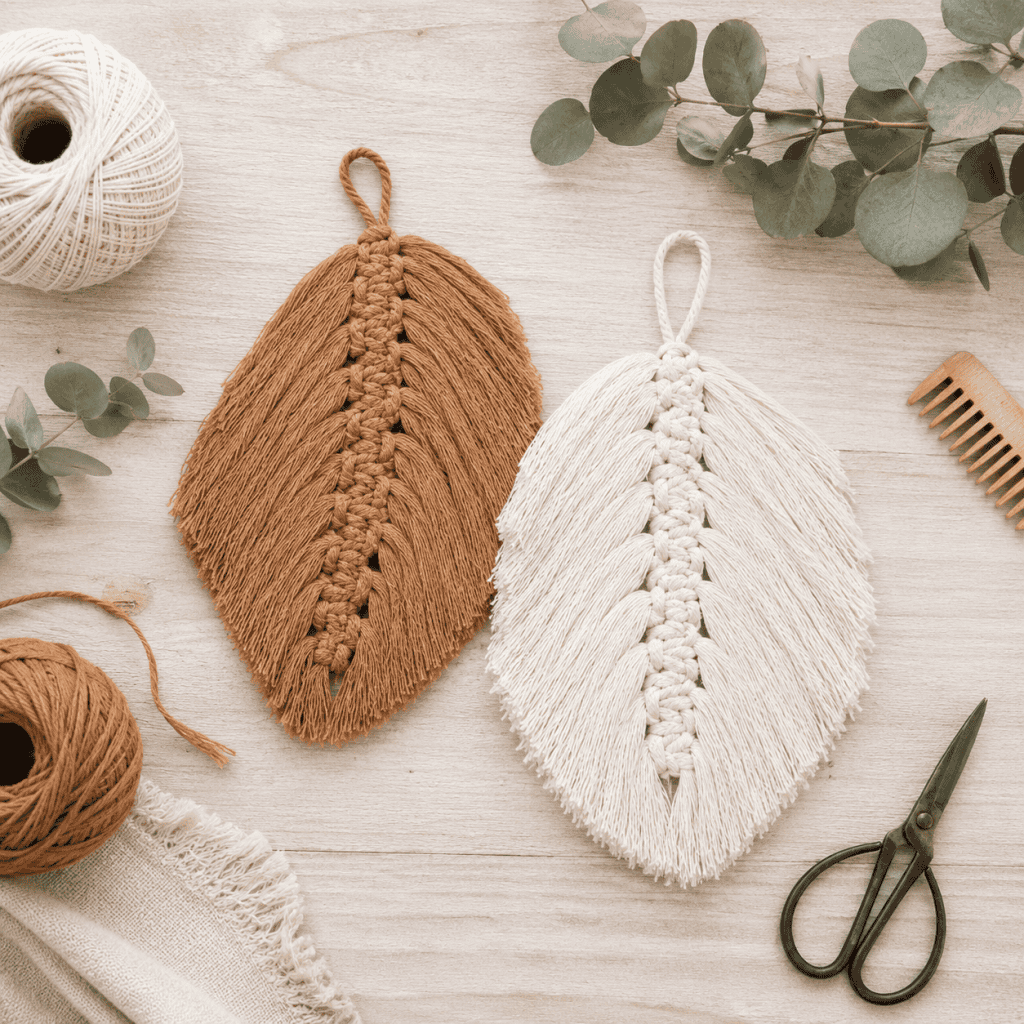
Macrame feathers are one of the easiest and most versatile macrame projects you can make. With just a few supplies and some basic knotting, you can create beautiful decorative feathers that work as wall art, ornaments, gift toppers, nursery decor, and more. They’re quick, inexpensive, and beginner-friendly, making them a great introduction to the world of macrame.
Whether you’re brand new to macrame or looking for a fast weekend project, this tutorial will show you exactly how to create soft, fluffy macrame feathers from simple cotton cord.
Why You’ll Love Making Macrame Feathers
Macrame feathers have become incredibly popular because they’re both beautiful and practical. Unlike large wall hangings that require extensive knotting, feathers can be completed in a relatively short amount of time while still delivering impressive results.
Some reasons crafters love macrame feathers include:
Beginner-friendly project
Affordable supplies
Fast to complete
Easy to customize
Great for gifts
Perfect scrap cord project
Suitable for home decor
Can be made in different sizes and colors
The finished feathers look professional even if you’ve never tried macrame before.
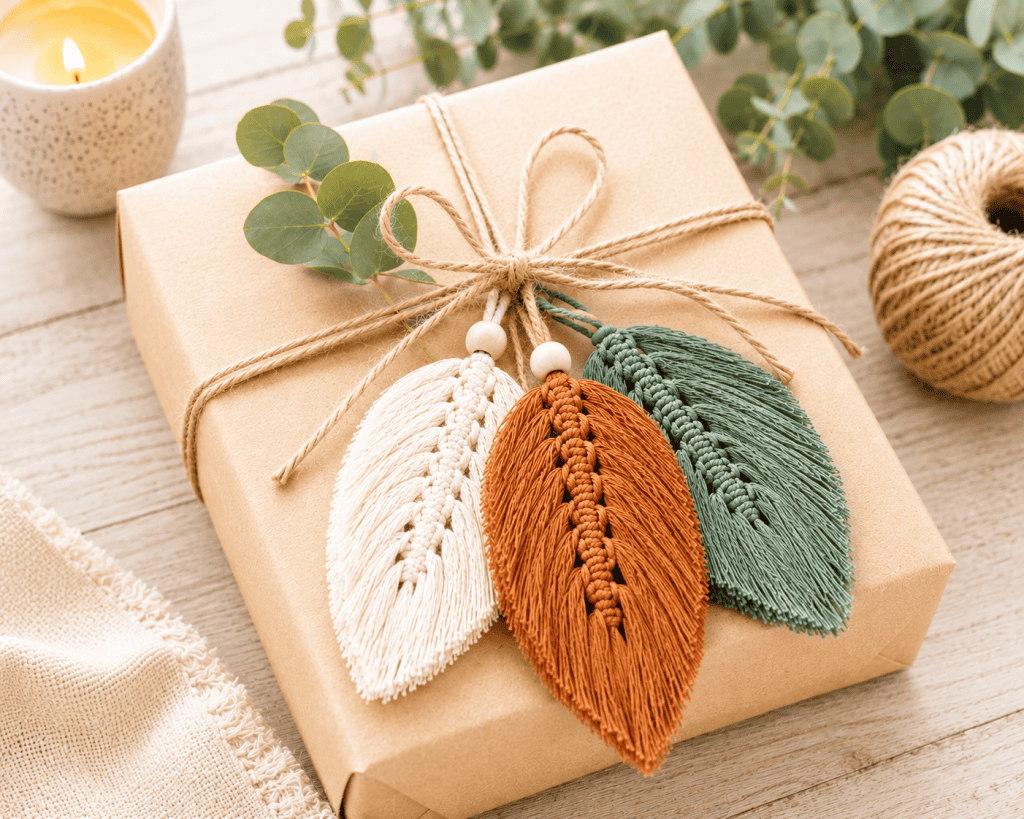
What Can You Use Macrame Feathers For?
One of the best things about DIY macrame feathers is their versatility.
Popular uses include:
Wall hangings
Nursery mobiles
Christmas ornaments
Gift toppers
Keychains
Bag charms
Boho home decor
Garland decorations
Seasonal displays
Wedding decor
You can hang a single feather for a minimalist look or group several together for a larger statement piece. Macrame feathers are commonly used as part of wall hangings and nursery decor projects.
Looking for free knitting patterns? Browse this full collection of easy knitting patterns you can start today:
50 Free Knitting Patterns You’ll Actually Want to Make (Beginner-Friendly)
10 Easy Baby Knitting Patterns for Beginners
10 Quick Summer Knitting Patterns
15 Easiest Free Knitting Patterns
15 Easy Summer Knitting Patterns You Can Make This Weekend
10 Easy Baby Knitting Patterns That Look Impressive (But Are Actually Beginner-Friendly)
How to Make Macrame Feathers (Easy DIY Macrame Feather Tutorial for Beginners)
(As an Amazon associate, I earn from qualifying purchases)
Choosing the Best Cord for Macrame Feathers
The type of cord you choose can make a big difference in the final appearance of your feather.
Single-Strand Cotton Cord
This is often considered the best choice because it brushes out easily and creates a soft, fluffy texture.
Twisted Cotton Cord
Twisted cord is widely available and works well for feathers, although it may require a little more brushing.
Recycled Cotton Cord
Eco-friendly and available in many colors, recycled cotton cord can create beautiful results while reducing waste.
For beginners, 3mm cotton cord is usually the easiest material to work with.
Supplies Needed
For this project you’ll need:
3mm Macrame cord
Sharp scissors
Ruler
Fine-tooth comb or wire brush
Stiffening spray or spray starch
These basic supplies are all that’s required to create fluffy, well-shaped feathers. Fabric stiffener helps the finished feather maintain its shape after brushing and trimming..
How to Make Macrame Feathers
Cut the cord into the following lengths:
For a Large Feather (approximately inches 9 long): 1 – 20 inch piece, 10 – 12 inch pieces, 10 – 10 inch pieces, 10 – 8 inch pieces
For a Small Feathers (approximately 6 inches long) 1- 12 inch piece, 6 – 6 inch pieces, 6 – 4 1/2 inch pieces, 6 – 3 1/2 inch pieces

Fold the longest piece in half. This will be the spine of the feather that all the other cords get knotted onto. You’re going to start with the longest cords and work down to the shortest.
Take the 12 inch cord (if making the large feather, or the 6 inch cord if making the small) and fold it over. Place underneath the spine, with the loop facing to the left. Fold a second 12 inch (or 6 inch cord for the smaller feather) cord over and lay it onto of the spine. Insert the ends of the first cord through the loop. Insert the ends of the top loop through the loop underneath the spine.

Pull on both sides to tighten the knot.

This time you’re going to alternate the direction of the loop. or the first knot, it was on the left side, now it will be on the right side.

Repeat the steps to make a second knot.

Repeat the knotting process until all the long cords have been used. Then, move onto the middle length and finally, the shortest.

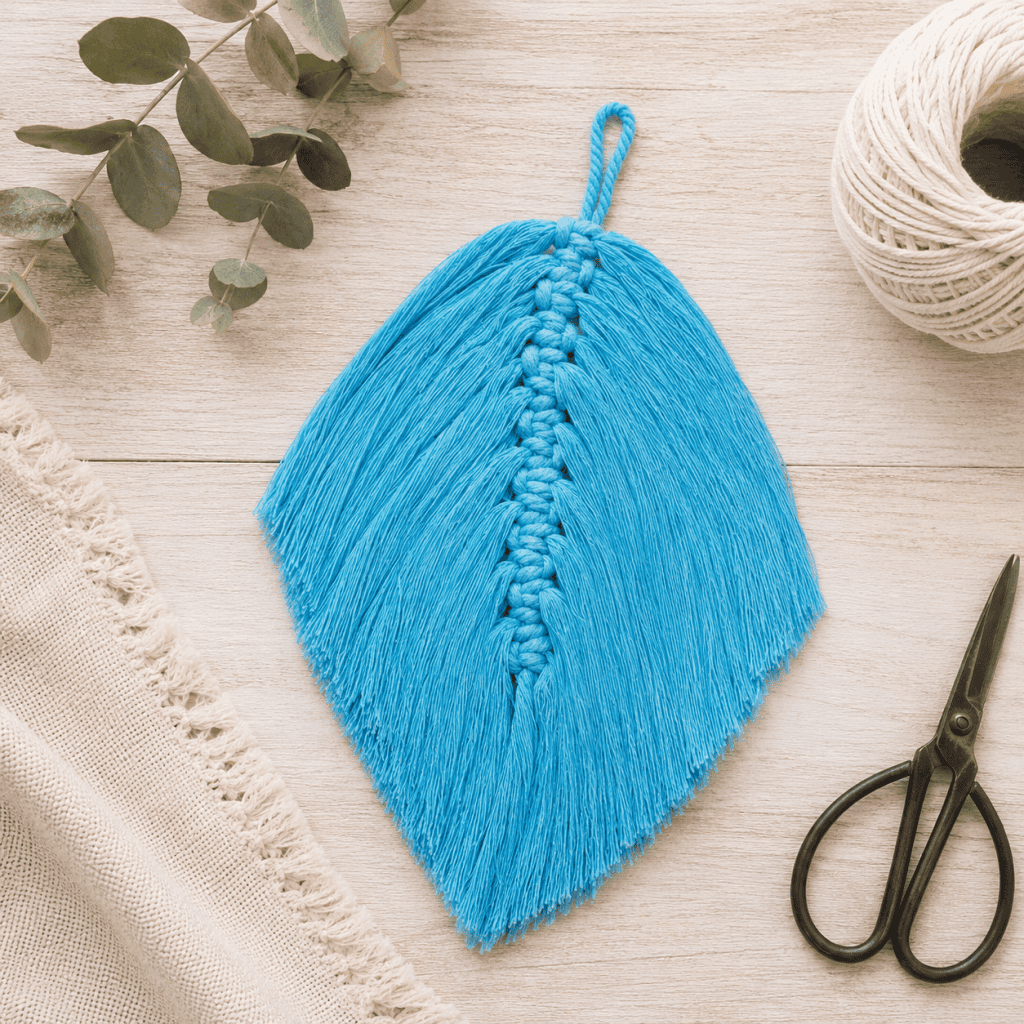
Once you are finished knotting, gently brush out the strands. Place one hand on the spine while you brush so the cords don’t pull out.

This is what the feather should look like when you are finished brushing.

Trim into a feather shape.
Spray with stiffening spray and let dry.
Looking for More Home and Apparel crafts?
How to Ice Dye Fabric: Easy DIY Ice Dyeing Tutorial for Beginners
DIY Marbled Flower Pot Tutorial (Easy + Budget-Friendly Painted Planters)
DIY Floral Party Backdrop for Under $15 (Easy Budget-Friendly Party Decor)
Raffia Pom Pom Sandals DIY (Easy Summer Sandals You Can Make in Under an Hour)
DIY Fabric Transfer Tea Towels (Easy Custom Kitchen Towel Tutorial)
DIY Macrame Plant Hanger (Easy Beginner-Friendly Hanging Planter You Can Make in an Afternoon)
How to Make Container Candles (Easy DIY Soy Candles for Beginners)
How to Make Custom Flower Pots With Cricut (Easy DIY Gift Idea for Beginners)
Common Mistakes to Avoid
Using the Wrong Cord
Some cords don’t brush out easily and can leave the feather looking rough rather than fluffy.
Over-Brushing
Brushing too aggressively can weaken the spine and loosen knots.
Skipping the Stiffener
Without starch or stiffener, your feather may lose its shape after handling.
Uneven Trimming
Trim slowly and check both sides often to maintain symmetry.
Fun Ways to Customize Macrame Feathers
Once you’ve mastered the basic feather, try adding your own creative touches.
Use Different Colors
Create feathers in:
Cream
Sage green
Terracotta
Dusty pink
Mustard yellow
Natural cotton
Add Wooden Beads
Wooden beads add a beautiful boho touch.
Create Layered Designs
Attach multiple feathers to a dowel or branch for a dramatic wall hanging.
Try Ombre Effects
Dip-dye the ends for a modern look.
More Easy Macrame Projects to Try
If you enjoyed making macrame feathers, you might also like:
DIY Framed Macrame Wall Art (Easy Boho Wall Decor You Can Make in an Afternoon)
How to Make a Macrame Yoga Mat Strap
Macrame Knots for Beginners: 3 Essential Knots (Step-by-Step Guide)
How to Make an Easy Macrame Ghost
Frequently Asked Questions about How to Make Macrame Feathers
What cord works best for macrame feathers?
Single-strand cotton cord is usually the easiest to brush out and creates the fluffiest results.
Can I make macrame feathers without stiffener?
Yes, but they may lose their shape more easily over time.
How long does it take to make one feather?
Most beginners can complete a feather in about 20–30 minutes.
Can I use yarn instead of macrame cord?
Cotton yarn can work, but macrame cord typically produces a fuller feather.
Are macrame feathers beginner-friendly?
Absolutely. They are one of the easiest macrame projects for new crafters.
Can I wash macrame feathers?
Spot cleaning is recommended. Washing may affect the shape and stiffness.
Macrame feathers are a simple project that delivers beautiful results. With just a few pieces of cotton cord, some basic knotting, and a little trimming, you can create stylish boho decor for your home or thoughtful handmade gifts for friends and family. They’re quick enough for beginners, versatile enough for experienced makers, and easy to customize with different colors and sizes.
Once you’ve made your first feather, you’ll quickly discover how fun it is to create entire collections for wall hangings, nursery decor, holiday ornaments, and more. Before long, you’ll have a basket full of beautiful handmade macrame feathers ready to decorate every corner of your home.
✨ I’d love to see what you’re making! ✨
If you’ve tried one of my knitting patterns, crochet projects, DIYs, or recipes, share your finished project on Instagram and tag me so I can see it 💛
There’s nothing better than seeing your creations come to life—from cozy knits to delicious recipes and everything in between. It truly makes my day!
Tag me @ginamicheleny so I can share your work and cheer you on!
Happy knitting