
DIY Tote Bag Organizer & Everyday Wellness
DIY tote bag organizer tutorial. Learn how to sew an easy bag insert with pockets for everyday organization and travel.

If you’ve ever dug through your tote bag trying to find your keys, phone, or wallet, you know how frustrating it can be when everything ends up at the bottom. A simple solution? Make your own DIY tote bag organizer—a practical, beginner-friendly sewing project that instantly transforms any bag into a neatly organized space.
This easy tote bag organizer is designed to keep your everyday essentials in place while still being flexible enough to fit inside different bags. Whether you’re using a large tote, a beach bag, or an everyday carry-all, this project helps you stay organized without sacrificing style.
Best of all, this is a quick and approachable sewing project that doesn’t require a pattern, making it perfect for beginners or anyone looking for a satisfying, functional DIY.
Why You’ll Love This DIY Tote Bag Organizer
A tote bag organizer is one of those simple projects that makes a big impact in your daily routine. Instead of constantly searching for your belongings, everything has its own place.
This DIY organizer helps you:
keep essentials easily accessible
switch bags quickly without repacking
reduce clutter inside your tote
create a custom layout that works for your lifestyle
It’s also a great way to use fabric you already have on hand, making it both practical and budget-friendly.
If you enjoy simple sewing projects like this, you might also love:
👉 How to Make a Sewing Pattern out of Existing Shorts
👉 How to Sew An Easy Caftan Dress- No Pattern Needed!
A Perfect Beginner Sewing Project
If you’re new to sewing, this DIY tote bag organizer is a great place to start. The construction is straightforward, and you don’t need complicated techniques to get a polished result.
You’ll practice:
measuring and cutting fabric
sewing straight seams
creating pockets
basic construction
Because it’s a smaller project, it’s easy to complete in a single afternoon, making it perfect for building confidence.
If you’re just getting started with DIY projects, explore more here:
👉 Gina Michele Sewing Projects and Patterns
Choosing the Right Fabric
The fabric you choose will determine how structured and durable your organizer is. For best results, choose a medium- to heavy-weight fabric like canvas, denim, or cotton twill.
These fabrics provide enough structure to help the organizer hold its shape while still being easy to sew. If you prefer a softer look, you can use lighter cotton, but you may want to add interfacing for extra support.
You can also use contrasting fabrics for the interior and pockets to create a more visually interesting design.
If you love working with fabric and customization, you might also enjoy:
👉 How to Make a Sewing Pattern Out Of Existing Shorts
Free T-Shirt Sewing Pattern for Boys and Girls
How to Sew a Kids Beach Towel Poncho- no pattern necessary!
DIY Tote Bag Organizer & Everyday Wellness
Supplies for DIY Tote Bag Organizer:
Cotton twill fabric (about 1/2 yard)
Sewing Machine
Iron

The pattern pieces are shown above. Cut 2 out for each size shown. The 10×14 in the main part of the organizer and the other sizes make the pockets.

Take both sides of the pockets. Place them on top of each other- right sides together and sew as shown.
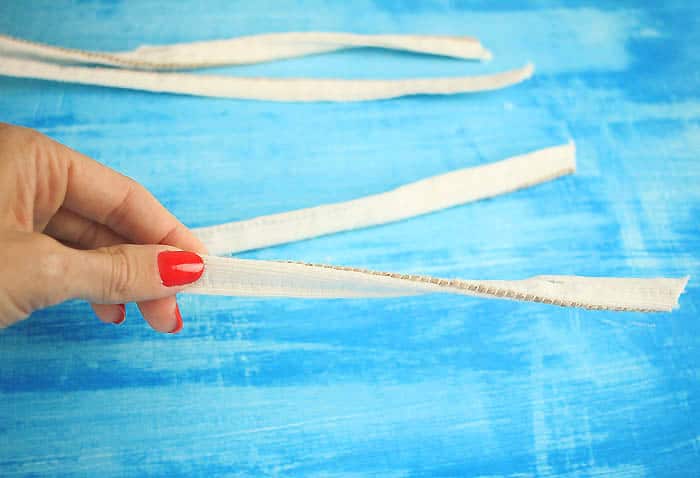
For the ties, cut two pieces of fabric measuring 16 inches long and 1 1/2 inches wide. Using an iron, press the short ends inward to create clean edges, then fold each strip lengthwise and press again so the raw edges are enclosed. Once pressed, topstitch along the open side of each tie to secure the fold and create a neat, durable finish.

Sew the pockets securely onto the main body of the organizer, making sure they are evenly spaced and aligned so each section is functional and easy to use. Take your time with this step to reinforce the top edges of the pockets, especially if you plan to carry heavier items like phones, wallets, or small notebooks.
Once the pockets are attached, place the backing piece of the organizer right sides together on top of the main panel, lining up all edges carefully. Next, position the ties between the layers along the top edge, folding them inward so the ends are tucked inside and the raw edges are aligned with the seam. Pin everything in place to keep it secure while sewing.
Sew all the way around the perimeter of the organizer, using a consistent seam allowance and reinforcing the corners for durability. Be sure to leave a small opening along one side—this will allow you to turn the organizer right side out once stitching is complete.
After sewing, carefully turn the organizer through the opening, gently pushing out the corners so they are crisp and fully shaped. Then, fold in the raw edges of the opening and topstitch along the edge to close the gap and give the organizer a clean, finished look. This final step not only secures the opening but also adds extra structure and durability to your project.

Turn the organizer right side out.

Slip stitch the seam closed.

The organizer ties on to the tote bag straps, making it so easy to switch from one bag to another!
How This Tote Organizer Comes Together
This DIY tote bag organizer is typically constructed as a rectangular insert with multiple pockets sewn along the inside or outside. The goal is to create compartments that keep your items separated and easy to find.
You’ll start by measuring the inside of your tote bag to determine the size of your organizer. From there, you can cut your fabric pieces and plan your pocket layout.
Once the pockets are sewn in place, the main body of the organizer is assembled and stitched together. The result is a structured insert that fits neatly inside your tote and keeps everything organized.
Because the construction is simple, you can easily adjust the design to fit your needs.
Customize Your Organizer for Your Lifestyle
One of the best things about this project is how customizable it is. You can design your organizer to fit exactly what you carry every day.
Consider adding:
larger pockets for notebooks or tablets
smaller compartments for keys and lip balm
a zippered section for valuables
elastic loops for water bottles or accessories
This flexibility makes the organizer incredibly useful and ensures it works for your specific routine.
Perfect for Travel, Work, and Everyday Use
A tote bag organizer isn’t just for everyday errands—it’s also incredibly useful for travel and work.
For travel, it keeps your essentials in one place so you can easily transfer them between bags. For work, it helps keep everything organized and accessible, from notebooks to chargers.
It’s also a great option for parents who need to carry multiple items and want to stay organized on the go.
Why Handmade Organization Solutions Work Better
Store-bought organizers can be helpful, but they often don’t fit your exact needs. Making your own allows you to customize everything—from size to pocket placement—so it works perfectly for you.
Handmade solutions also tend to be more durable and better suited to your lifestyle because they’re designed with intention.
Make It Stylish
Functionality doesn’t mean sacrificing style. Choosing fabrics you love can turn this organizer into a beautiful accessory that complements your bag.
You can go with neutral tones for a clean, minimal look or choose bold prints for something more fun and eye-catching.
Adding small details like contrasting stitching or decorative edges can also elevate the design.
Great for Gifting
A DIY tote bag organizer also makes a thoughtful and practical gift. It’s something people will actually use every day, and the handmade element adds a personal touch.
You can customize the fabric and layout based on the recipient’s style and needs, making it a truly unique gift.
If you enjoy giftable projects, you might also like:
👉 Scrap Yarn Pumpkin Knitting Pattern
👉 Easy Plush Bee Knitting Pattern
Build Your DIY Skills with Functional Projects
Projects like this tote organizer are a great way to build your DIY skills while creating something useful. They allow you to practice techniques in a low-pressure way while still producing a finished piece you’ll use regularly.
As you become more comfortable, you can move on to more complex projects with confidence.
Once you finish your tote organizer, you’ll likely be inspired to start another project. Creating functional, handmade items is incredibly satisfying and opens the door to endless possibilities.
Explore more ideas here:
👉How to Sew a Reversible Kids Tank
How to Make Kids Leggings without a Pattern
This DIY tote bag organizer is the perfect combination of simple, practical, and customizable. With basic sewing skills and a little creativity, you can create a piece that makes your everyday routine easier and more organized.
Whether you’re making it for yourself or as a gift, this is one of those projects that delivers immediate results and lasting usefulness. Once you start using it, you’ll wonder how you ever managed without it.
✨ I’d love to see what you’re making! ✨
If you’ve tried one of my knitting patterns, crochet projects, DIYs, or recipes, share your finished project on Instagram and tag me so I can see it 💛
There’s nothing better than seeing your creations come to life—from cozy knits to delicious recipes and everything in between. It truly makes my day!
Tag me @ginamicheleny so I can share your work and cheer you on!
Happy making!


Wonderful project! This is a lovely to give as a gift! Thanks for the idea.
I'm thinking about buying a bag organizer then I saw your post. Thank you for sharing the tutorial!!
piknu