DIY Framed Macrame Wall Art (Easy Boho Wall Decor You Can Make in an Afternoon)
Learn how to make DIY framed macrame wall art with this easy beginner-friendly tutorial. Create beautiful boho wall decor using simple macrame knots and an affordable frame.
Looking for an easy and affordable way to add warmth and texture to your home? This DIY Framed Macrame Wall Art project is the perfect beginner-friendly craft for creating beautiful boho-inspired wall decor without needing advanced macrame skills.
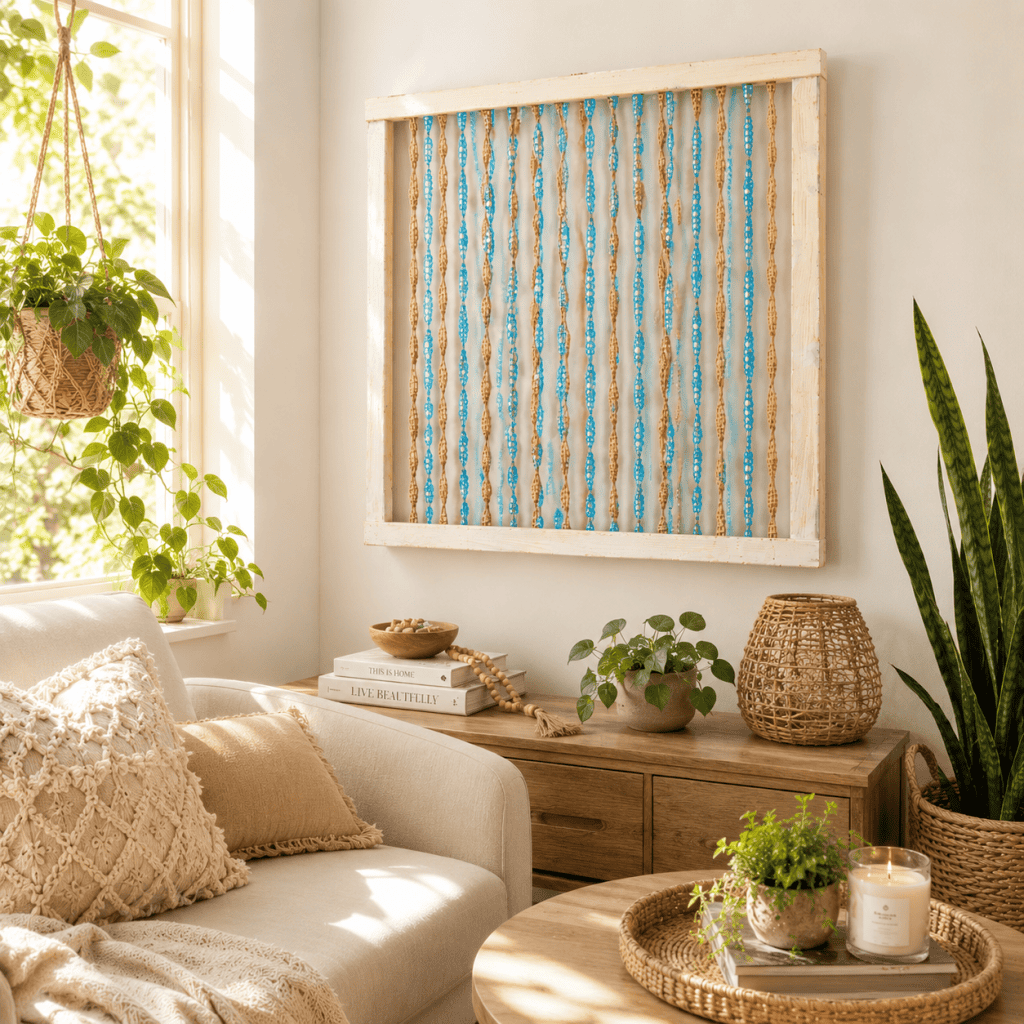
Framed macrame art combines the soft texture of traditional macrame with the clean, modern look of a wood frame. The result is a stylish handmade piece that looks high-end while remaining surprisingly simple to make. Whether you’re decorating a bedroom, nursery, office, or cozy living room, this project instantly adds warmth and personality to your space.
One of the best things about this DIY framed macrame wall art tutorial is how customizable it is. You can easily change the frame size, cord color, knot pattern, or fringe length to match your personal style and home decor aesthetic.
This project is especially perfect for beginners because it uses simple macrame techniques and basic supplies. Even if you’ve never tried macrame before, you can create a beautiful handmade wall hanging in just an afternoon.
If you love easy DIY home decor projects, you may also enjoy my DIY Outdoor Chalkboard, DIY Cedar Window Boxes, and Envelope Pillow Cover Tutorial.
Why You’ll Love This DIY Framed Macrame Wall Art
There are so many reasons this framed macrame project has become a favorite among DIY and home decor lovers.
First, it’s beginner-friendly. Unlike large macrame wall hangings that require complicated knot work and lots of cord, this project keeps things simple and approachable.
Second, it’s affordable. You only need a few supplies to create a piece that looks like boutique home decor.
This DIY framed macrame wall art project is also:
Beginner-friendly
Budget-friendly
Perfect for boho decor
Quick to make
Easy to customize
Great for apartments and small spaces
Lightweight and easy to hang
Stylish and modern
Because the project combines texture and clean lines, it works beautifully in modern farmhouse, coastal, Scandinavian, minimalist, and boho-inspired homes.
How to make the Spiral Knot in Macrame
Start by tying on 4 cords.
1. Bring the right cord over and to the left of the two filler cords.
2. Place the left cord over the right cord.
3. Bring the left cord under the filler cords and through the loop formed by the right cord.
4. Pull to on the ends to tighten.
Looking for free knitting patterns? Browse this full collection of easy knitting patterns you can start today:
50 Free Knitting Patterns You’ll Actually Want to Make (Beginner-Friendly)
10 Easy Baby Knitting Patterns for Beginners
10 Quick Summer Knitting Patterns
15 Easiest Free Knitting Patterns
15 Easy Summer Knitting Patterns You Can Make This Weekend

DIY Framed Macrame Wall Art (Easy Boho Wall Decor You Can Make in an Afternoon)
(As an Amazon Associate, I earn from qualifying purchases)
Finished wall art measures 27 1/4 x 27 1/4 inches
Supplies needed:
Pine 1×2
Lumber Cuts:
Cut 4, 1x2s that measure 27 3/4 inches each
Staple gun
Wood glue and Pin nail gun (I used this one)
Macrame cord (I used 3mm cotton)
Step by Step Instructions:

The first step is to build the frame. The top and bottom 1x2s will sit on top of the sides. Add a small amount of wood glue and nail the corners of the frame together.

Instead of a wooden dowel, the macrame is secured to the back of the frame.
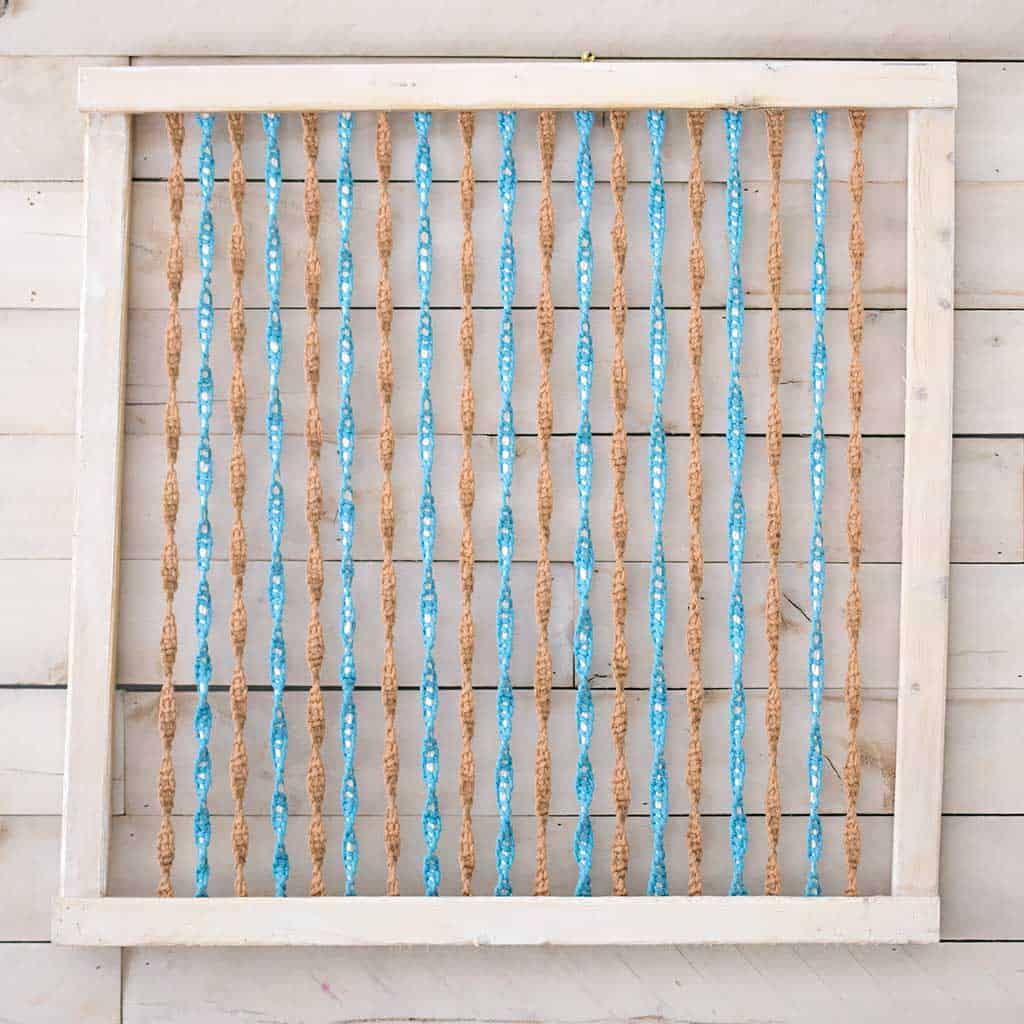
The macrame spiral knots will be 1 inch apart. You will need 4 strands to make the knot. I cut 2 cotton cord strands (measuring approximately 180 inches), folded them over, and stapled them to the top of the frame.
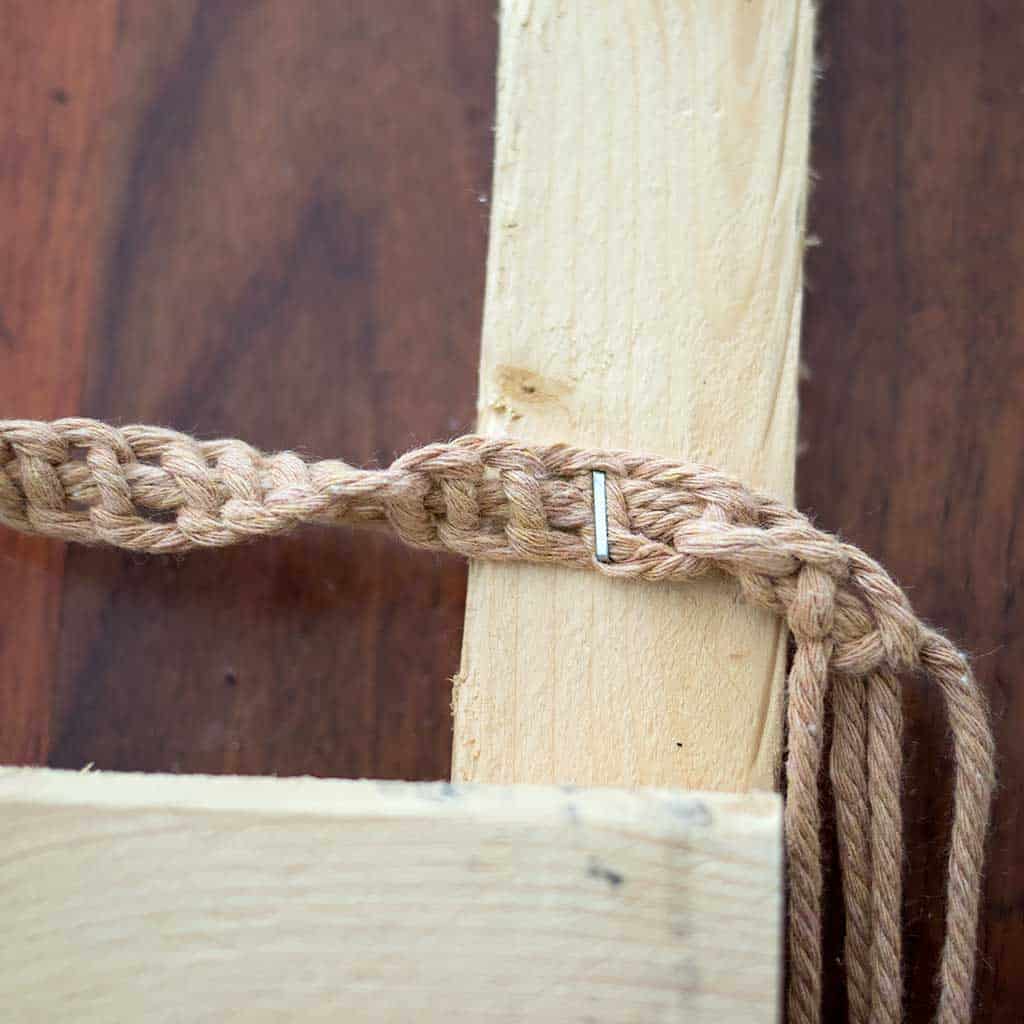
Make the spiral knot (as shown in the video) and staple the end to the bottom of the frame. Trim the excess cord with a pair of scissors.
I alternated between tan spiral knots and blue and white to add visual interest.
Once I was finished knotting, I decided that the frame would look better whitewashed. I watered down interior paint and applied it with a paintbrush. (It’s a lot easier to paint or stain the frame before you add the macrame.)

Looking for more Easy Macrame Projects?
How to Make Macrame Feathers
How to Make a Macrame Yoga Mat Strap
Macrame Knots for Beginners: 3 Essential Knots (Step-by-Step Guide)
Easy Macrame Tips for Beginners
If you’re new to macrame, don’t worry—this DIY framed macrame wall art project is very beginner-friendly.
Start Simple
Choose one or two basic knots instead of trying complicated patterns immediately.
Keep Tension Consistent
Try to keep your knots evenly tightened throughout the project for a cleaner finished look.
Use Plenty of Cord
Macrame uses more cord than most beginners expect. It’s always better to cut extra length.
Embrace Imperfection
Handmade decor is meant to feel organic and unique. Small variations actually add charm and texture.
Where to Display Framed Macrame Wall Art
One of the reasons framed macrame wall art is so popular is because it works beautifully in almost any room.
Try displaying it:
Above a bed
In a nursery
Over a console table
In an entryway
In a home office
On a gallery wall
In a cozy reading nook
Layering framed macrame with mirrors, woven baskets, or neutral textiles creates a warm designer-inspired space.
How to Customize Your Macrame Wall Art
This project is incredibly versatile and easy to personalize.
Try Different Cord Colors
Cream and ivory create a timeless boho aesthetic, while black, terracotta, or muted greens can feel more modern.
Add Beads or Texture
Wood beads and mixed fibers create added visual interest.
Use Different Frame Sizes
Small frames work beautifully grouped together, while oversized frames create dramatic statement pieces.
Experiment With Patterns
Mixing knot styles creates more texture and dimension.
Looking for more craft projects like this DIY Macrame wall hanging?
How to Ice Dye
How to Make Twine from Fabric Scraps
How to Fluid Paint for Total Beginners
DIY Trellis (Easy, Budget-Friendly Garden Upgrade That Looks Expensive)
How to Build an Easy Kayak Rack (Cheap DIY That Holds Multiple Kayaks)
FAQ About DIY Framed Macrame Wall Art
Is macrame difficult for beginners?
Not at all. This framed macrame wall art project is especially beginner-friendly because it uses simple knots and smaller sections of cord compared to larger wall hangings.
What type of cord works best?
Cotton macrame cord works best because it’s soft, easy to knot, and creates beautiful fringe texture.
Can I use any frame?
Yes! You can make your own frame or use thrifted frames, unfinished wood frames, or even painted frames depending on your style.
How long does this project take?
Most beginners can complete this project in an afternoon or weekend depending on the frame size and knot complexity.
Does framed macrame work with modern decor?
Absolutely. Framed macrame combines texture with clean lines, making it work beautifully in both boho and modern spaces.
Can I make this project without macrame experience?
Yes. Even complete beginners can create beautiful framed macrame wall art using a few simple knots.
This DIY Framed Macrame Wall Art project is one of the easiest ways to add warmth, texture, and personality to your home decor. It’s beginner-friendly, budget-friendly, and customizable enough to fit almost any decorating style.
Whether you’re creating a cozy boho bedroom, refreshing a gallery wall, or simply looking for a relaxing creative project, this framed macrame art is a beautiful handmade addition to your home.
Best of all, the simple techniques make this project approachable even for beginners, while the finished result looks stylish and high-end.
I love seeing your finished projects! If you enjoyed making this DIY Framed Macrame Wall Art or any of my other home decor projects, I’d love to see yours on Instagram, just tag me @ginamicheleny. Happy crafting!