
How to Upgrade Your Windows With Craftsman Style Trim
Learn how to upgrade your windows with Craftsman style trim. Easy DIY window trim tutorial with step-by-step instructions.
If you’re looking for a simple way to make your home look more custom and high-end, installing Craftsman style window trim is one of the best DIY upgrades you can make.
Plain builder-grade window trim often looks thin and unfinished, but Craftsman window trim adds architectural detail and character that can transform the look of an entire room.
The best part is that this project is surprisingly beginner friendly. With a few basic tools and inexpensive materials, you can upgrade your windows and give your home a beautiful Craftsman-style finish.
In this tutorial, I’ll show you how to install Craftsman style window trim step by step, along with tips for achieving a clean, professional look.
If you enjoy DIY home projects like this one, be sure to explore my collection of:
👉 DIY Indoor Projects
https://gina-michele.com/category/DIY-Home/
You’ll find many easy home improvement ideas to help upgrade your space.
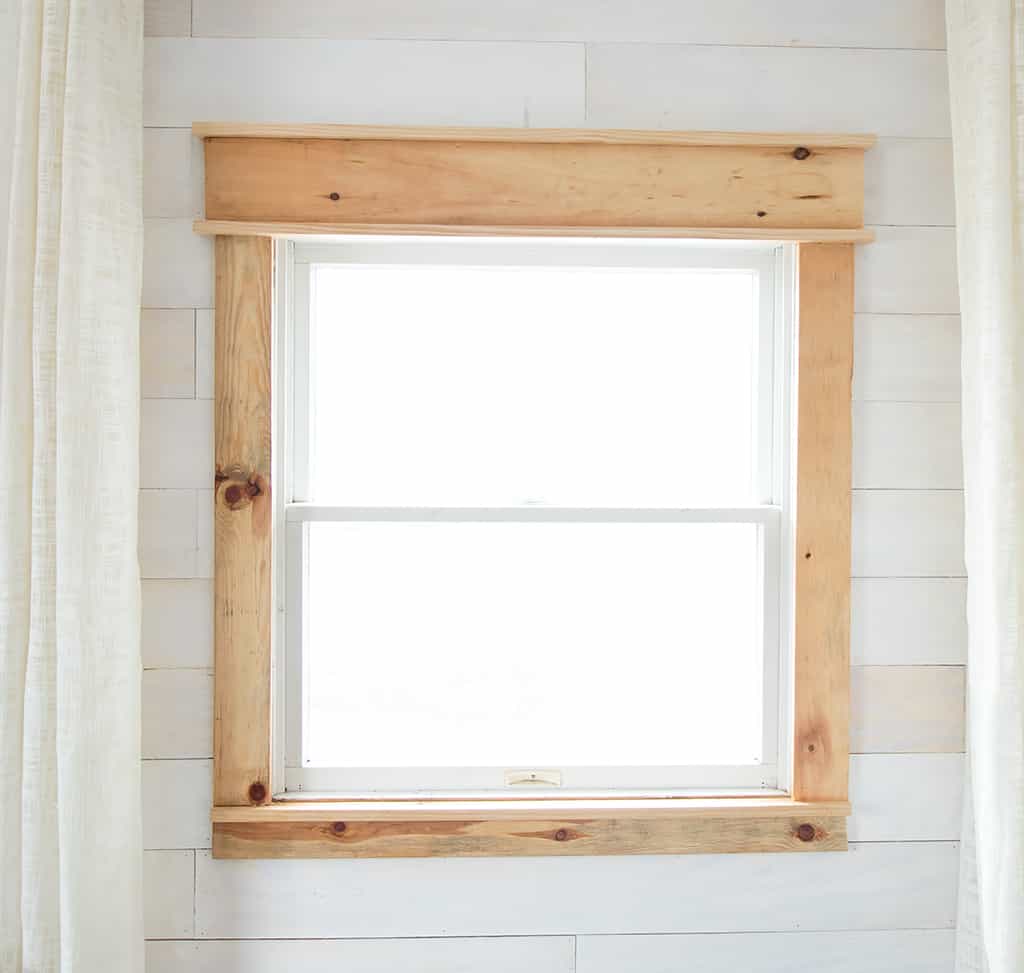
What is Craftsman Style Window Trim?
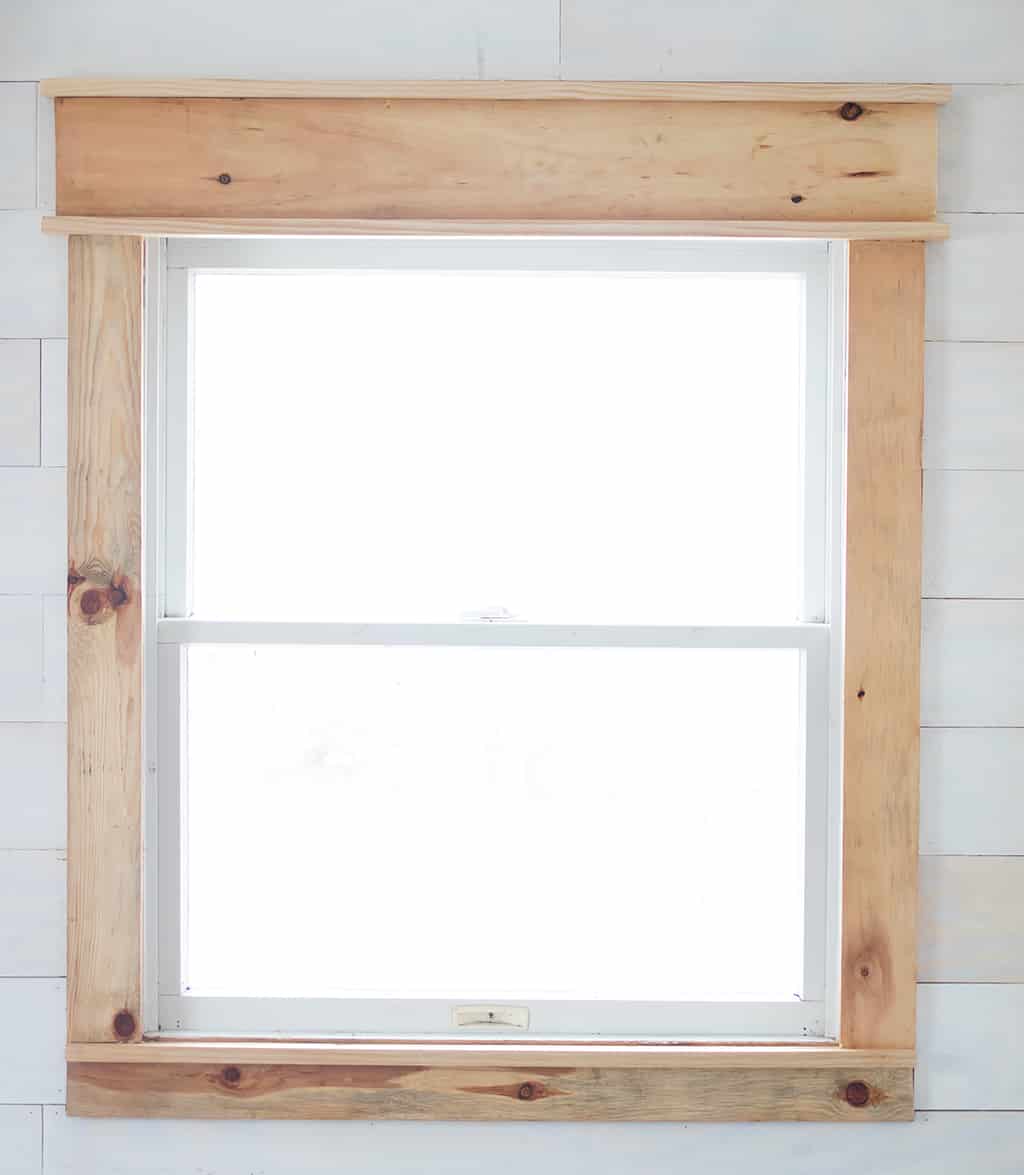
Craftsman style trim is known for its clean lines and layered design. Instead of thin molding, Craftsman trim uses flat boards and a stacked top header to create a bold architectural look.
This style was popularized during the American Craftsman movement in the early 1900s, but it remains extremely popular today in both traditional and modern homes.
Common features of Craftsman window trim include:
• Flat vertical side boards
• A thicker top header or cap
• Clean, square edges
• Simple, layered molding details
Because the design uses straight cuts rather than complicated angles, it’s actually easier to install than traditional decorative trim.
Why Upgrade Your Window Trim?
Upgrading your window trim is one of the easiest ways to make a home look more finished and custom.
Many homes are built with very minimal trim around windows, which can make a room feel unfinished. Adding Craftsman style trim instantly creates a more polished look.
Benefits of installing Craftsman window trim include:
• Adds architectural character
• Makes windows look larger and more substantial
• Improves the overall look of a room
• Increases perceived home value
• Budget-friendly DIY project
Even a single afternoon project can dramatically change the appearance of a room.
If you enjoy home improvement projects like this, you can browse more ideas in my:
👉 DIY Home Projects Collection
https://gina-michele.com/category/DIY-Home/
Some Easy DIY Home Projects include:
How to Build an Easy Kayak Rack
$20 Laminate Kitchen Counter Makeover
How To Build a Privacy Screen Planter
How to Build an Outdoor Planter for $20
KEEP IN TOUCH! FOR MORE INSPIRATIONS, PROJECTS, AND FREE KNITTING PATTERNS, SIGN UP FOR OUR WEEKLY NEWSLETTER:
Looking for more Home DIY Projects?
How To Build a Privacy Screen Planter
How to Build an Outdoor Planter for $20
Wood needed:
1 x 2s (2 for the top of the window, 1 for the bottom)
1 x 4s (for the sides)
1 x 6 (for the top of the window)
Tools needed:
Circular, Table or Miter saw
Nail gun
How to Upgrade Your Windows With Craftsman Style Trim

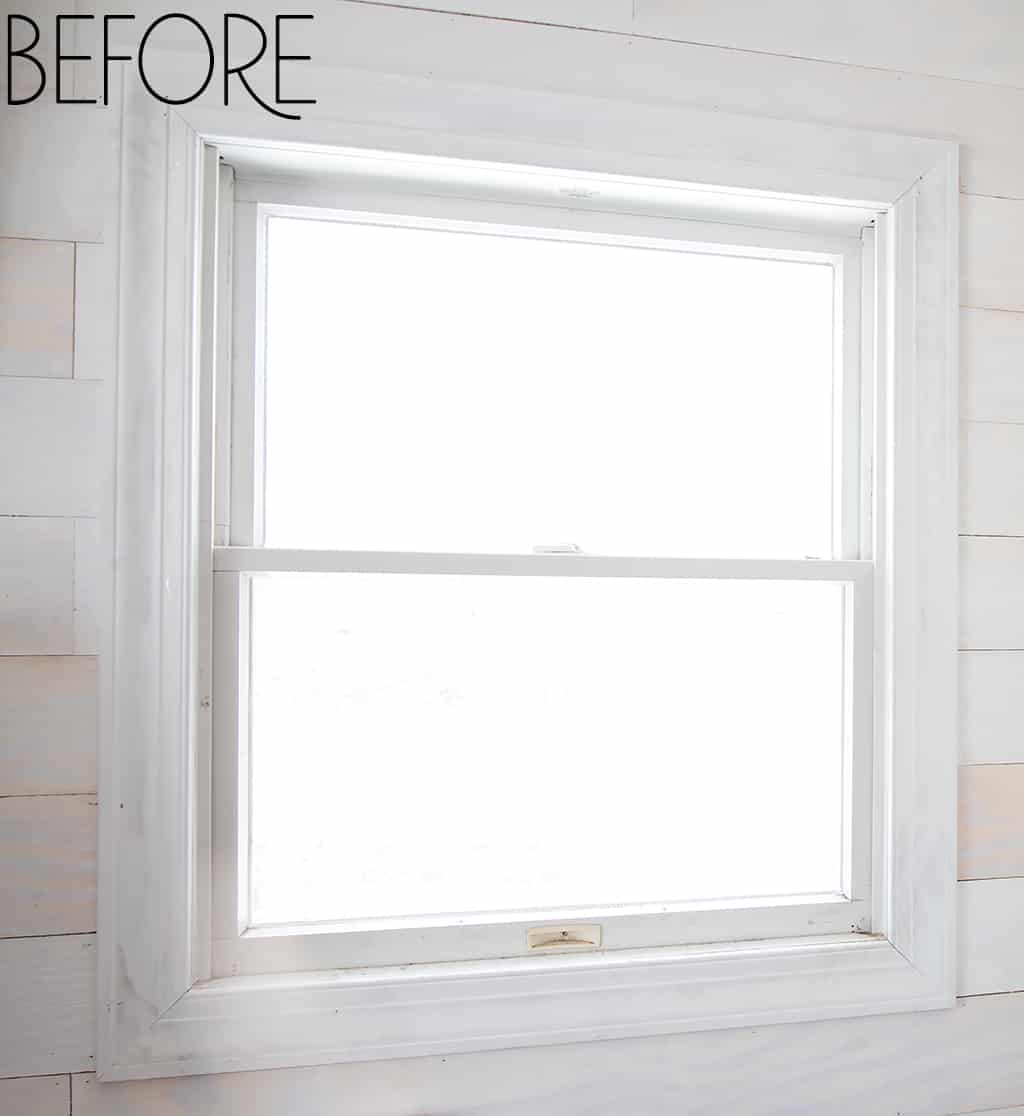
Step 1: Remove Existing Window Trim
The first step is removing the old trim around your window.
Use a pry bar or trim removal tool to carefully loosen the existing molding. Take your time so you don’t damage the surrounding drywall.
Once the trim is removed, clean the surface and remove any leftover nails or debris.
Step 2: Measure the Window Opening
Accurate measurements are essential for achieving a professional-looking result.
Measure the height and width of your window opening so you can cut the new trim pieces correctly.
Because Craftsman trim uses straight cuts, you won’t need complicated mitered corners.
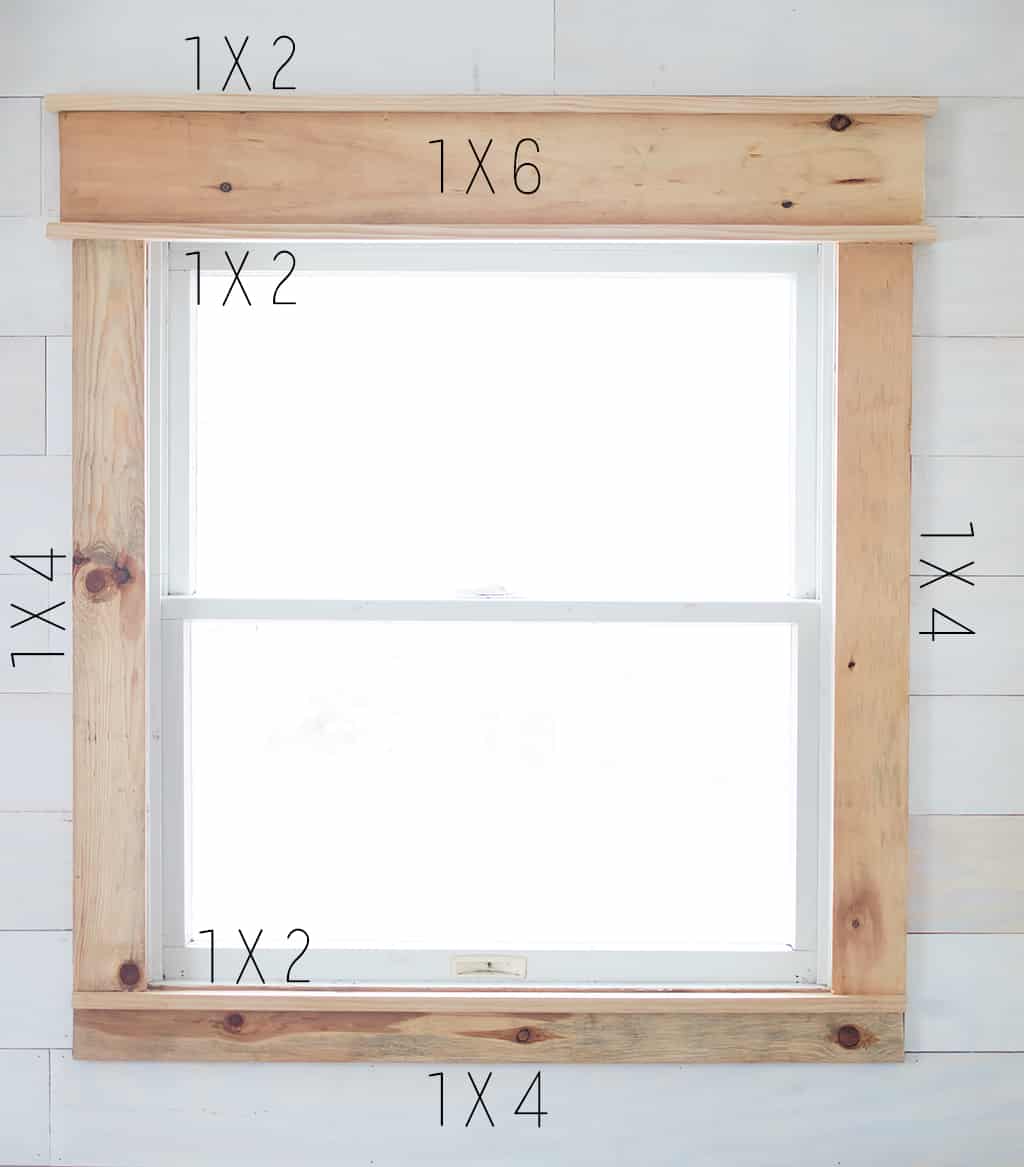
Step 3: Install the Side Trim Boards
Cut two vertical boards that will run along each side of the window.
Use a level to ensure the boards are straight before attaching them.
Secure the boards with finishing nails or a nail gun.
These vertical boards create the base structure of the Craftsman trim.
Step 4: Install the Window Header
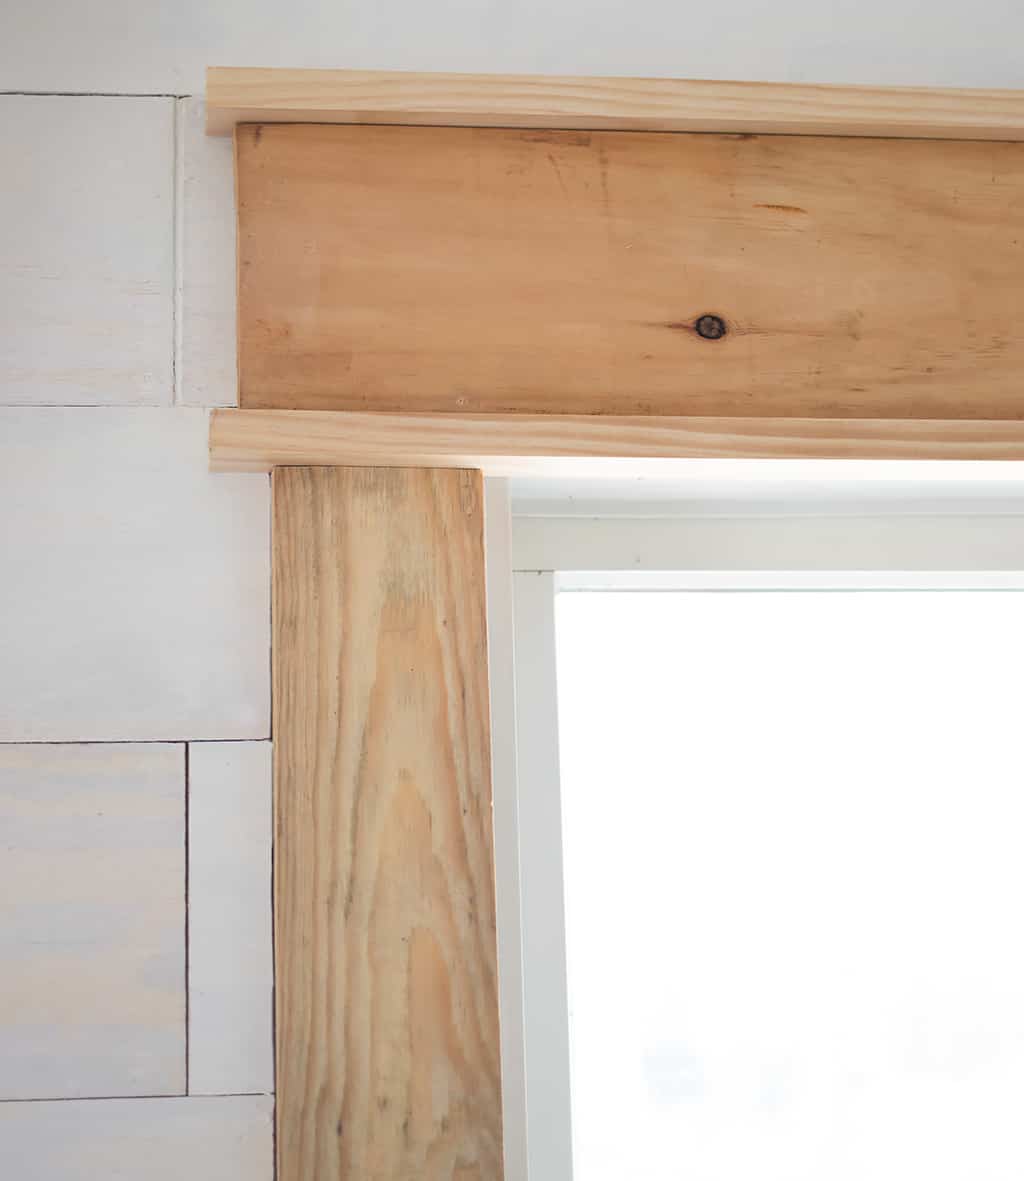
The header board is one of the defining features of Craftsman trim.
Cut a wider board that will sit horizontally across the top of the window.
The header should extend slightly past the vertical trim boards to create the classic Craftsman look.
Attach the board using finishing nails.
Step 6: Fill Nail Holes and Caulk
After installing the trim boards, use wood filler to fill any nail holes.
Once the filler dries, sand the surface smooth.
Step 7: Paint the Trim (Optional)
The optional final step is painting the trim. I left mine natural.
White paint is a classic choice for Craftsman style window trim, but you can choose any color that complements your room.
Apply primer first if needed, followed by two coats of paint.
Once the paint dries, your window trim upgrade is complete.
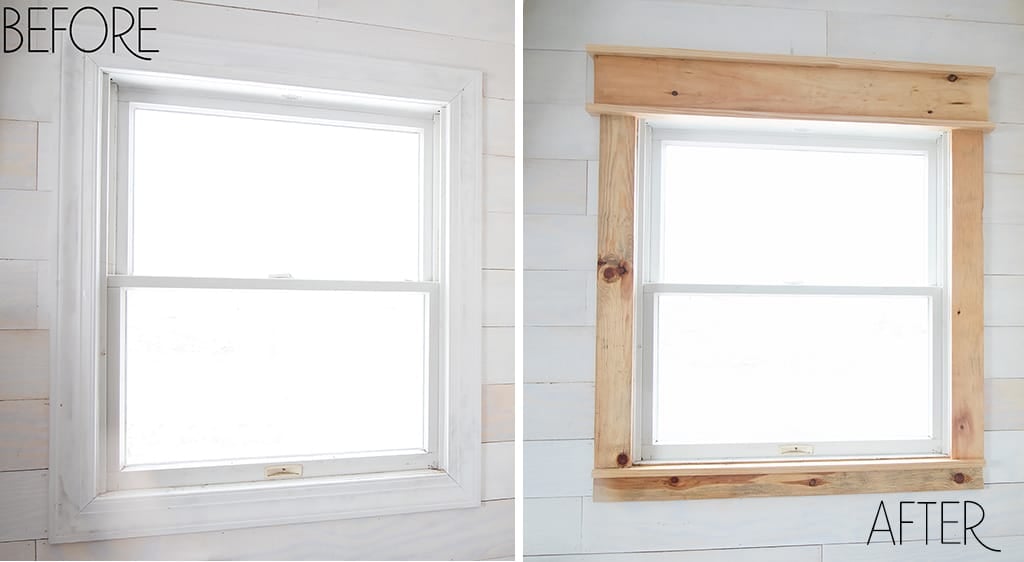
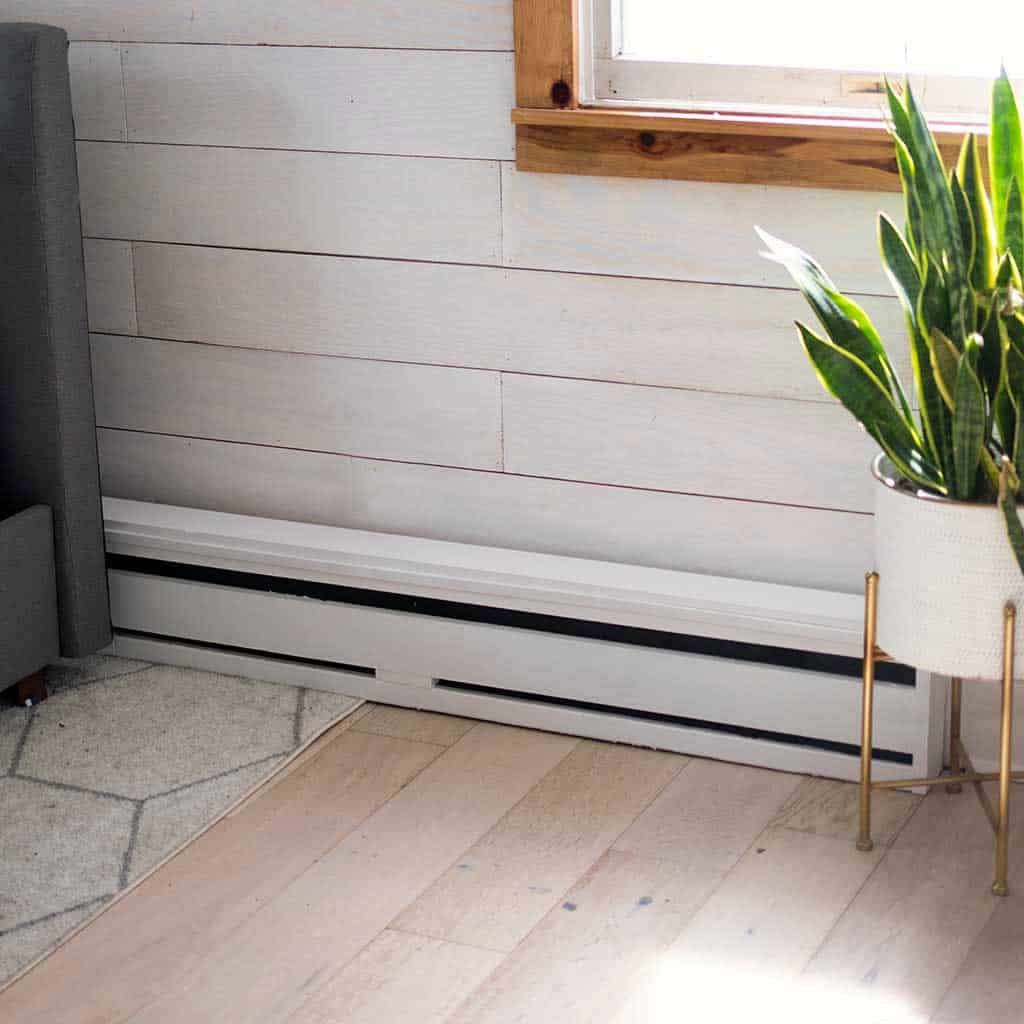
How Craftsman Window Trim Transforms a Room
One of the reasons this project is so popular is the dramatic difference it makes.
Before installing trim, windows often look plain and unfinished. After adding Craftsman style trim, the windows become a focal point of the room.
The layered design adds depth and gives the room a custom-built appearance.
Many homeowners find that upgrading window trim makes the entire space feel more polished and intentional.
Tips for a Professional Finish
If you want your DIY Craftsman window trim to look professional, here are a few helpful tips.
Use a level frequently
Keeping trim boards perfectly level ensures clean lines.
Fill gaps with caulk
Caulk helps hide small imperfections and creates a seamless appearance.
Sand before painting
Sanding smooths rough edges and improves paint adhesion.
Use quality paint
Durable trim paint creates a long-lasting finish.
More DIY Indoor Projects
If you enjoy upgrading your home with simple DIY projects, you may also like exploring more ideas from my:
👉 DIY Indoor Projects Collection
https://gina-michele.com/category/DIY-Home/
Here are a few projects you might enjoy:
• Simple home decor projects
• Easy woodworking ideas
• DIY home upgrades
• Budget-friendly home improvements
These projects are designed to be beginner friendly and achievable with basic tools.
Why DIY Home Projects Are Worth It
DIY home projects can be incredibly rewarding. Not only do they allow you to customize your home, but they can also save money compared to hiring contractors.
Small upgrades like Craftsman window trim can make a home feel more custom without requiring a large renovation budget.
Many homeowners find that completing projects themselves also creates a greater sense of pride in their home.
Frequently Asked Questions
What is Craftsman style window trim?
Craftsman style window trim is a type of interior trim known for its clean lines and simple layered design. Instead of thin decorative molding, Craftsman trim uses wider flat boards and a thicker header at the top of the window. This creates a bold, architectural look that adds character to a room.
The style originated during the American Craftsman movement in the early 1900s and remains popular today in both traditional and modern homes. Many homeowners choose Craftsman window trim because it looks custom while still being relatively simple to install.
Is Craftsman window trim difficult to install?
No, one of the reasons many DIY homeowners choose Craftsman style window trim is because it is actually easier to install than many other trim styles.
Traditional trim often requires angled cuts and complex molding profiles. Craftsman trim, however, typically uses straight cuts and flat boards, which makes the installation process much more beginner friendly.
With basic tools like a miter saw, nail gun, and measuring tape, many homeowners can install DIY window trim in a single afternoon.
What wood should I use for Craftsman window trim?
Several types of wood work well for DIY window trim projects. The most common options include:
• Pine – affordable and easy to work with
• Poplar – smooth and great for painting
• MDF trim boards – budget friendly and consistent
• Oak – durable and ideal for stained trim
For most DIY projects, pine or poplar are excellent choices because they are widely available and easy to cut and install.
Can I install Craftsman trim over existing trim?
In some cases, you can install Craftsman style trim over existing trim, but it usually looks best when the old trim is removed first. Removing the existing trim allows the new boards to sit flush against the wall and creates a cleaner, more professional finish.
If the old trim is very thin, some homeowners choose to build the new trim around it. However, removing the old trim typically produces the best results.
How much does it cost to add Craftsman window trim?
The cost of installing Craftsman window trim is relatively low compared to other home upgrades. Most windows can be upgraded for $20–$50 in materials, depending on the type of wood used.
Because the project uses simple boards and minimal materials, it’s one of the most affordable ways to give a room a more custom appearance.
If you install the trim yourself, you can save even more money compared to hiring a contractor.
Do I need a nail gun to install window trim?
A nail gun can make installing trim faster and easier, but it’s not strictly required. Many DIYers install Craftsman window trim using a hammer and finishing nails.
A nail gun does provide a cleaner finish and helps secure the boards quickly, especially when working with multiple windows.
If you plan to do several DIY trim projects, investing in a nail gun can be worthwhile.
Can Craftsman trim work in modern homes?
Yes! Although the style originated in Craftsman architecture, Craftsman window trim looks beautiful in many types of homes, including modern, farmhouse, and traditional interiors.
The clean lines and simple design make it versatile enough to work with many decorating styles.
Many homeowners use Craftsman trim to upgrade builder-grade homes and create a more custom, finished look.
Where can I find more DIY home projects?
If you enjoy projects like installing Craftsman window trim, you may also enjoy exploring more home improvement ideas in my DIY Indoor Projects collection.
👉 https://gina-michele.com/category/DIY-Home/
There you’ll find many easy DIY projects that can help transform your home, from simple decor ideas to beginner-friendly woodworking projects.
Installing Craftsman style window trim is one of the most impactful DIY upgrades you can make to your home. With simple materials and basic tools, you can transform plain windows into beautiful architectural features.
This project is approachable for beginners and can usually be completed in just a day.
If you’re looking for more inspiration, be sure to browse my collection of:
👉 DIY Indoor Projects
https://gina-michele.com/category/DIY-Home/
You’ll find plenty of creative ideas to help make your home more beautiful and functional.
I love seeing your finished projects! If you enjoyed this post, How to Upgrade Your Windows With Craftsman Style Trim or any of my other DIY projects, I’d love to see yours on Instagram, just tag me @ginamicheleny. Happy DIYing!


Great idea- and great tutorial on how to do it!
Have to confess tho, when I first read the title, I thought it was about the computer software Windows! LOL! Electronics are taking over our brains!!😳