DIY Outdoor Planter Box (Easy Wooden Planter Tutorial)
Learn how to build a beautiful DIY outdoor planter box with this easy step-by-step tutorial. This beginner-friendly wood planter project adds instant curb appeal to porches, patios, and gardens.
There’s something about a large outdoor planter that instantly makes a porch or patio feel polished and inviting. Oversized planters add height, texture, and color to outdoor spaces while creating that high-end designer look you see in magazines and home décor stores.
The only downside? Large outdoor planters can be incredibly expensive.
After pricing similar planters online and in garden centers, I decided to build my own DIY outdoor planter box instead — and I’m so glad I did. This project ended up being surprisingly easy, budget-friendly, and beginner-friendly.
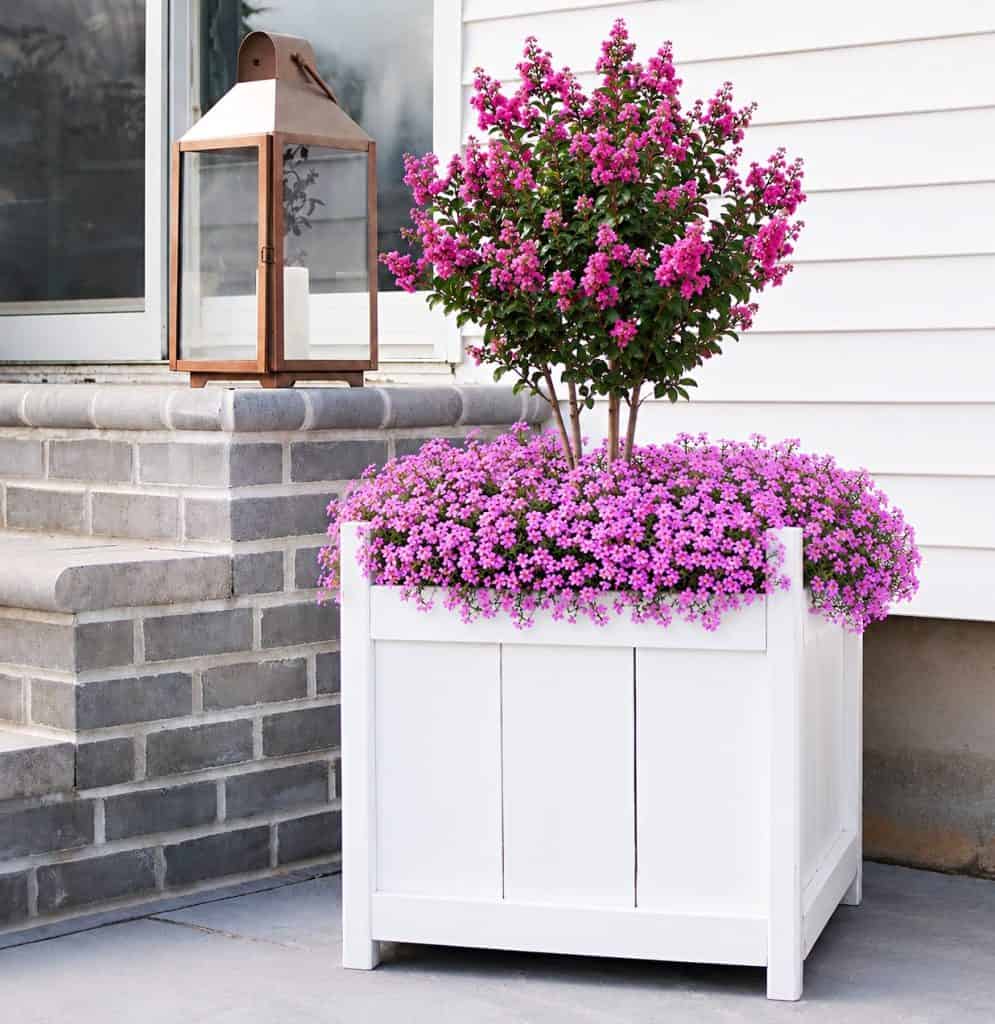
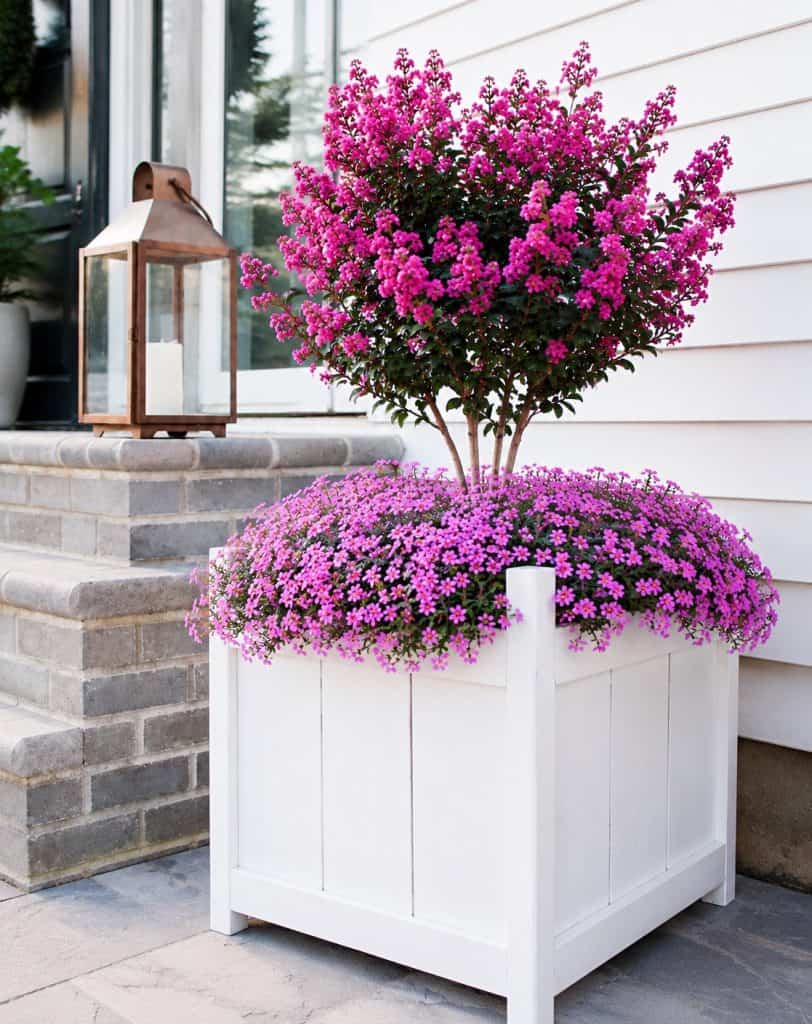
The finished planter has a clean, timeless design that works beautifully with coastal, farmhouse, cottage, and modern outdoor spaces. I styled mine with vibrant pink flowers and a crepe myrtle tree for a colorful summer look, but you can customize it with almost any plants or flowers you love.
Whether you’re decorating a front porch, patio, deck, or backyard, this DIY outdoor planter is an easy way to make your outdoor space look more expensive without spending hundreds of dollars.
Why You’ll Love This DIY Outdoor Planter
This wooden planter box is one of my favorite outdoor DIY projects because it’s:
Beginner-friendly
Affordable to build
Customizable
Great for flowers, shrubs, or small trees
Perfect for patios and front porches
Durable enough for outdoor use
The clean vertical board design gives it a modern yet classic look that works with almost any home style.
The Inspiration Behind This Planter
I wanted a large statement planter for my patio, but everything I found in stores was either:
Too expensive
Too small
Or made from plastic
I loved the look of oversized wood planters, especially the ones used to frame front doors or patios, so I decided to make my own version.
The best part is that this planter looks high-end but can be built for a fraction of the price of store-bought options.
Why Cedar Works Well for Outdoor Projects
Cedar naturally resists moisture and outdoor wear, making it a great option for planters.
Benefits of cedar:
Lightweight
Weather-resistant
Less prone to rot
Affordable
Easy to stain or paint
If you want your planter to last for years outdoors, cedar is definitely worth using.
DIY Outdoor Planter Box (Easy Wooden Planter Tutorial)
$20 Outdoor Planter DIY Supplies:
1 x 3 x 8 (2 total)
1 x 2 x 8 (1 total)
5 1/2 wide x 72 long pressure treated fence pickets (3 total)
2 x 2 x 8 (1 total)
1 1/4″ exterior screws
2 1/2″ exterior screws
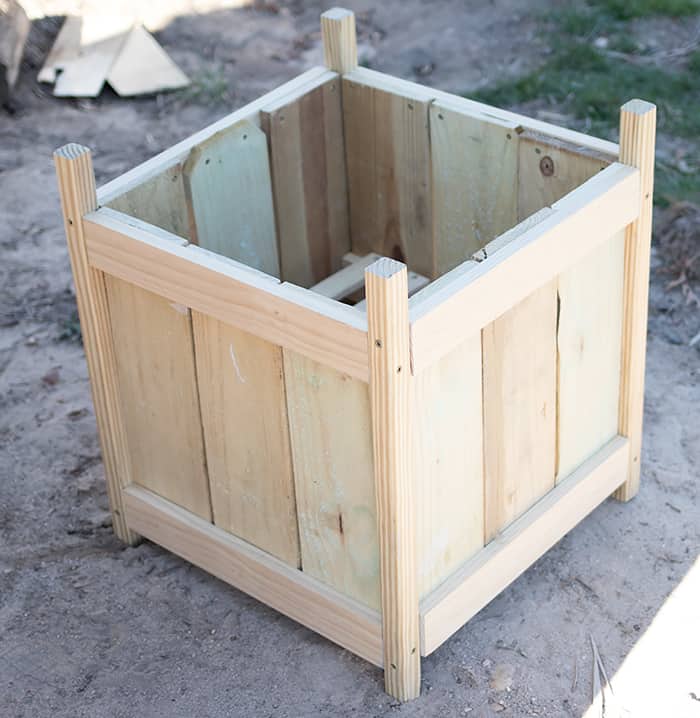
Cut the wood into the following pieces:
10 – 1 x 3 x 17
5 – 1 x 2 x 17
4 – 2 x 2 x 23 3/4
12 – cedar fence pickets 17 3/4 long
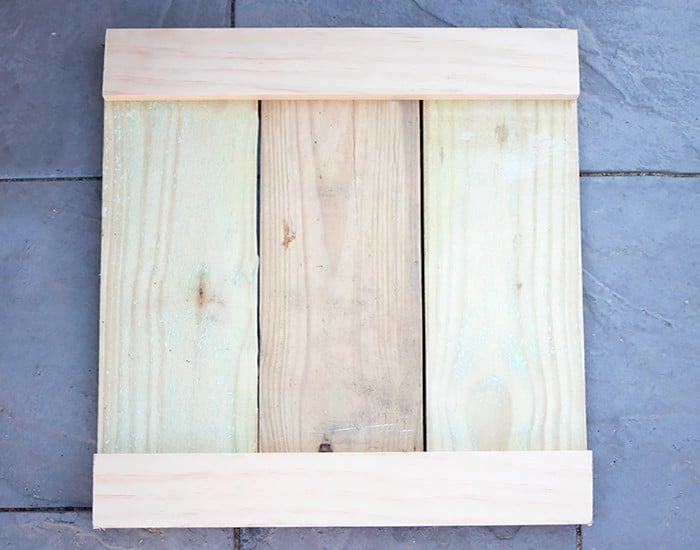
Take 2 pieces of the 1 x 3 x 17. Lie them flat and place 3 fence pickets over them. Screw in from the back using the 1 1/2 inch screws. Build 4 of these sides.

For 2 of the sides- center a 2 x 2 x 23 3/4 board on each side and screw it in place using the 2 1/2 inch screws.
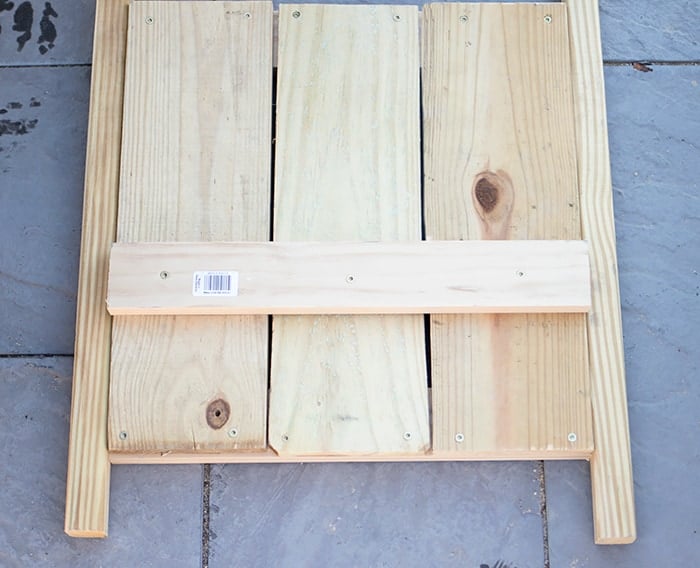
On the 2 sides with the legs- Take the 1 x 3 x 17 and screw it 6 inches up from the bottom using 1 1/2 inch screws.
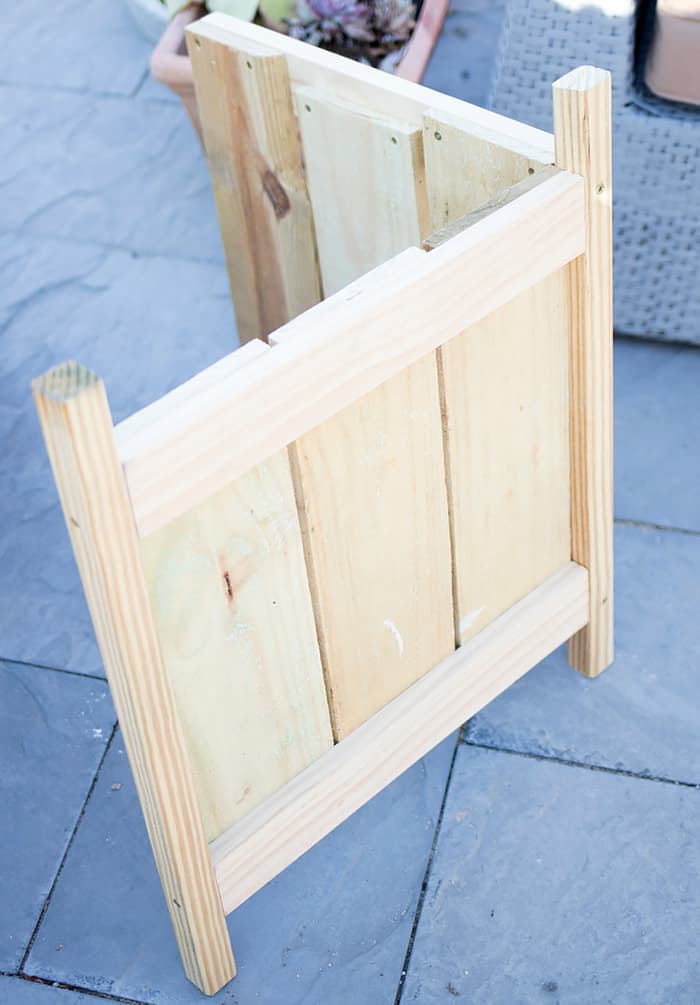
Screw the 4 sides together using the 2 1/2 inch screws. Screw together at the top and the bottom of the planter.
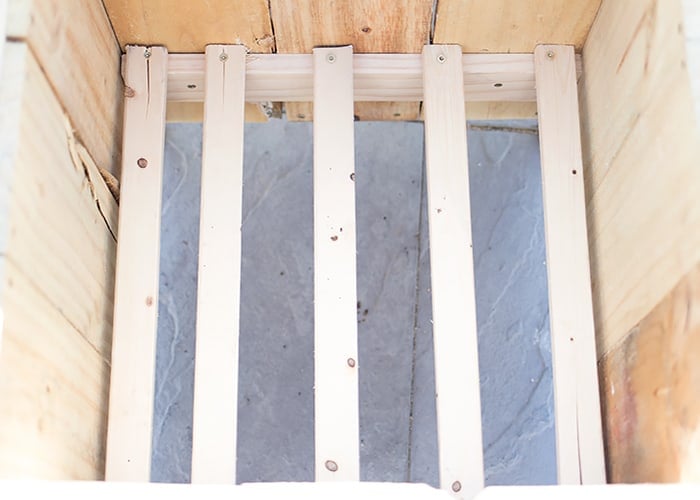
Screw the 1 x 2 x 17 slats to the bottom (on top of the cleats) using 1 1/2 inch screws. Place landscape fabric or coconut liner over the slats before planting.
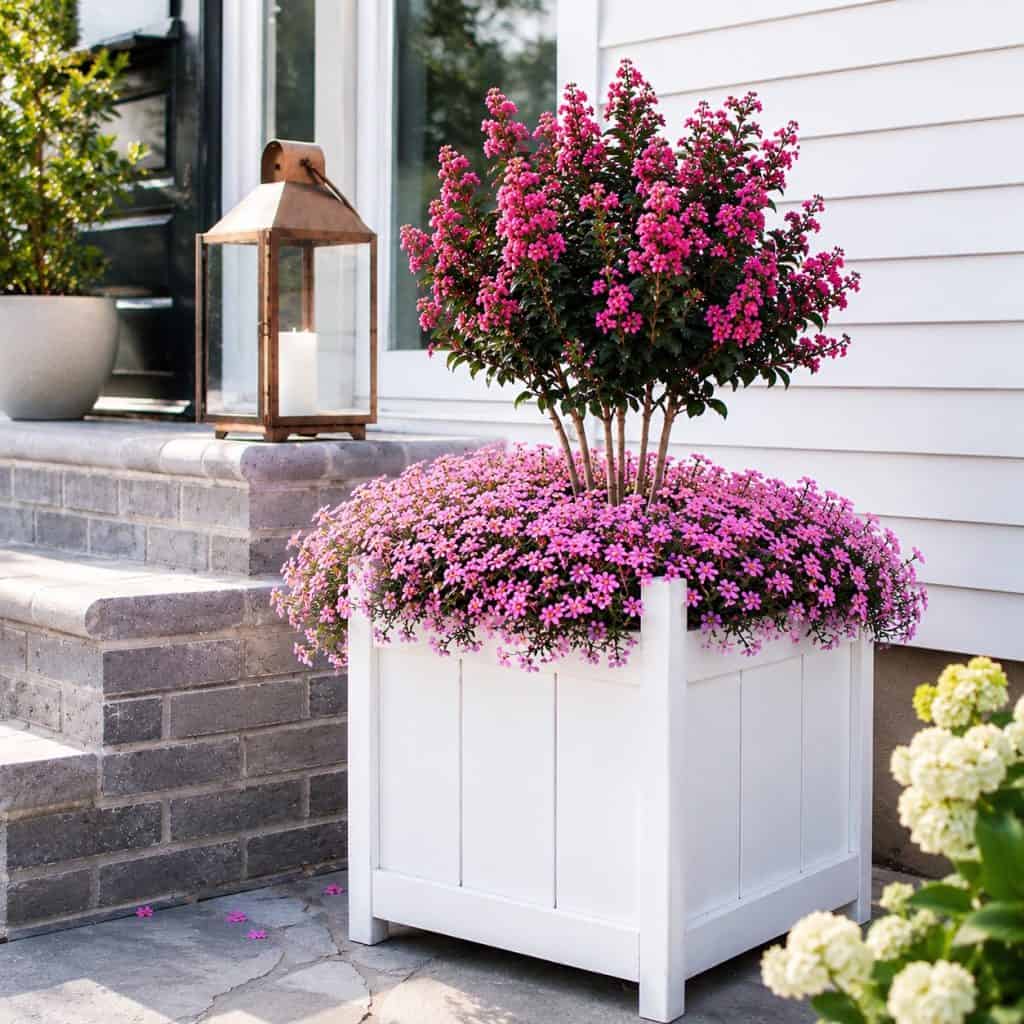
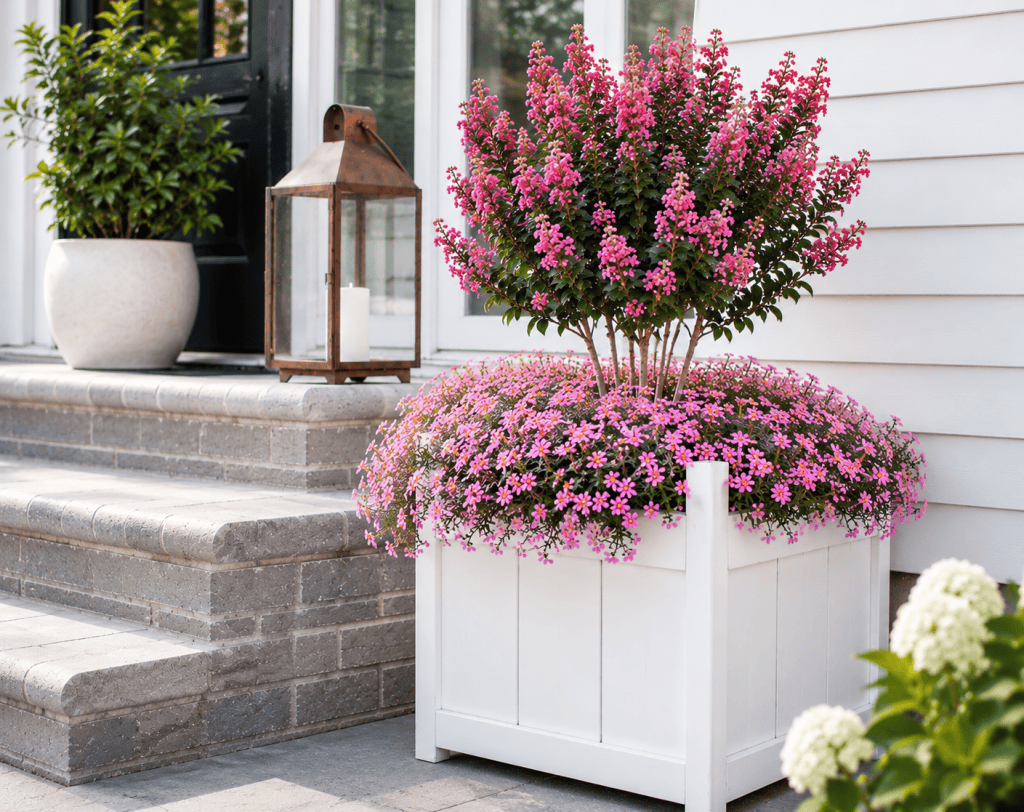
The next step is to paint or stain your planter. This is where you can customize the look of your planter.
I painted mine white for a clean coastal look that works beautifully against the bright flowers and gray stone patio.
Other beautiful options include:
Black
Natural cedar
Warm walnut stain
Soft sage green
Weathered gray
Be sure to use exterior paint or stain designed for outdoor use.
Looking for More Outdoor Planter DIY Projects?
Easy DIY Retaining Wall Planter (Beginner-Friendly & Budget Backyard Upgrade)
How to Build Tall Outdoor Planters
Easy Raised Vegetable Garden with Pea Gravel (Simple DIY for a Clean, Modern Backyard)
DIY Privacy Screen Planter That Actually Works (Full Backyard Privacy on a Budget)
How to Build an Easy Birdhouse Planter (DIY Garden Project for Beginners)
How to Protect Outdoor Planters
Outdoor furniture and décor take a lot of wear from:
Rain
Sun
Humidity
Dirt
Temperature changes
To help your planter last longer:
Use Exterior Screws
Exterior-rated screws resist rust and corrosion.
Seal the Wood
A weatherproof sealer helps protect against moisture damage.
Add Drainage
Never allow water to sit inside the planter.
Use a Liner
Landscape fabric or planter liners help protect the interior wood.
What to Plant in Outdoor Planters
One of the best things about large planters is how versatile they are.
You can plant:
Annual flowers
Lavender
Herbs
Ornamental grasses
Small shrubs
Hydrangeas
Topiary trees
Boxwoods
For this planter, I used:
A crepe myrtle tree for height
Cascading pink flowers for fullness and softness
The layered combination creates a lush, professionally styled look.
Tips for Styling Large Outdoor Planters
Use the “Thriller, Filler, Spiller” Method
This is one of the easiest ways to make planters look professionally designed.
Thriller = tall centerpiece plant
Filler = medium plants for fullness
Spiller = trailing plants that cascade over the edges
This creates beautiful balance and texture.
Keep Colors Cohesive
Choose flowers that complement your home exterior and outdoor furniture.
Use Symmetry
Matching planters on either side of a front door instantly create elegant curb appeal.
Where to Use DIY Outdoor Planters
These planters work beautifully in so many outdoor spaces.
Front Porch
Frame your entryway with matching planters.
Patio
Add greenery and softness to seating areas.
Pool Area
Use planters to make outdoor entertaining spaces feel more finished.
Deck
Break up large open deck spaces with tall planters.
Garden Pathways
Line walkways with matching planter boxes for a high-end look.
Why DIY Planters Are Better Than Store-Bought
Building your own planter gives you:
Custom sizing
Better quality materials
Huge cost savings
More design flexibility
Many oversized planters sold online cost hundreds of dollars each, especially solid wood versions.
Making your own allows you to get the same look for far less money.
Common Outdoor Planter Mistakes to Avoid
Skipping Drainage
Poor drainage can damage plants and wood.
Using Interior Paint
Always choose exterior-rated finishes.
Overfilling With Soil
Large planters become extremely heavy once filled.
Forgetting a Liner
A liner helps extend the life of the planter.
More Outdoor DIY Projects You’ll Love
If you love outdoor DIY projects, be sure to check out these other ideas:
How to Paint Patio Cushions (An Easy Budget-Friendly Outdoor Makeover That Actually Lasts)
DIY Sandbox With Roof Plans (Easy Covered Sandbox for Kids + Budget-Friendly Backyard Build)
How to Build a DIY Cornhole Board (Easy Backyard Game You Can Make in a Weekend)
DIY Cedar Window Boxes: Easy Custom Planters That Make Your House Look Instantly Prettier
DIY Trellis (Easy, Budget-Friendly Garden Upgrade That Looks Expensive)
Rust-Oleum Outdoor Fabric Paint Review (Does It Actually Work?)
How to Build an Easy Kayak Rack (Cheap DIY That Holds Multiple Kayaks)
FAQ for DIY Outdoor Planter Box
What wood is best for outdoor planters?
Cedar is one of the best choices because it naturally resists moisture and outdoor conditions.
Do outdoor planters need drainage holes?
Yes. Proper drainage is essential for healthy plants and long-lasting wood planters.
Can beginners build this planter?
Absolutely. This is a simple woodworking project with straightforward cuts and assembly.
How long do wooden outdoor planters last?
With proper sealing and drainage, outdoor wood planters can last for many years.
Can I paint outdoor planter boxes?
Yes. Use high-quality exterior paint or stain for the best durability.
What plants work best in large planters?
Flowers, herbs, shrubs, ornamental grasses, and small trees all work beautifully.
This DIY outdoor planter box is one of those projects that instantly upgrades an outdoor space without costing a fortune.
It’s simple to build, beginner-friendly, and completely customizable to your style. Whether you use it on a patio, porch, deck, or garden, a large wood planter adds warmth, texture, and curb appeal to any outdoor area.
I especially love how versatile these planters are throughout the seasons. You can fill them with colorful summer flowers, cozy fall mums, winter evergreens, or fresh spring blooms for year-round style.
If you’ve been looking for an easy outdoor DIY project that makes a big visual impact, this planter is definitely worth building.
✨ I’d love to see what you’re making! ✨
If you’ve tried one of my knitting patterns, crochet projects, DIYs, or recipes, share your finished project on Instagram and tag me so I can see it 💛
There’s nothing better than seeing your creations come to life—from cozy knits to delicious recipes and everything in between. It truly makes my day!
Tag me @ginamicheleny so I can share your work and cheer you on!
Happy making!