How to Crochet a Stem on Pumpkins (Easy Beginner Tutorial)
Learn how to crochet a stem on pumpkins with this easy step-by-step tutorial. Add the perfect handmade finishing touch to your crochet pumpkins for cozy fall décor.
Add the Perfect Finishing Touch to Your Crochet Pumpkins
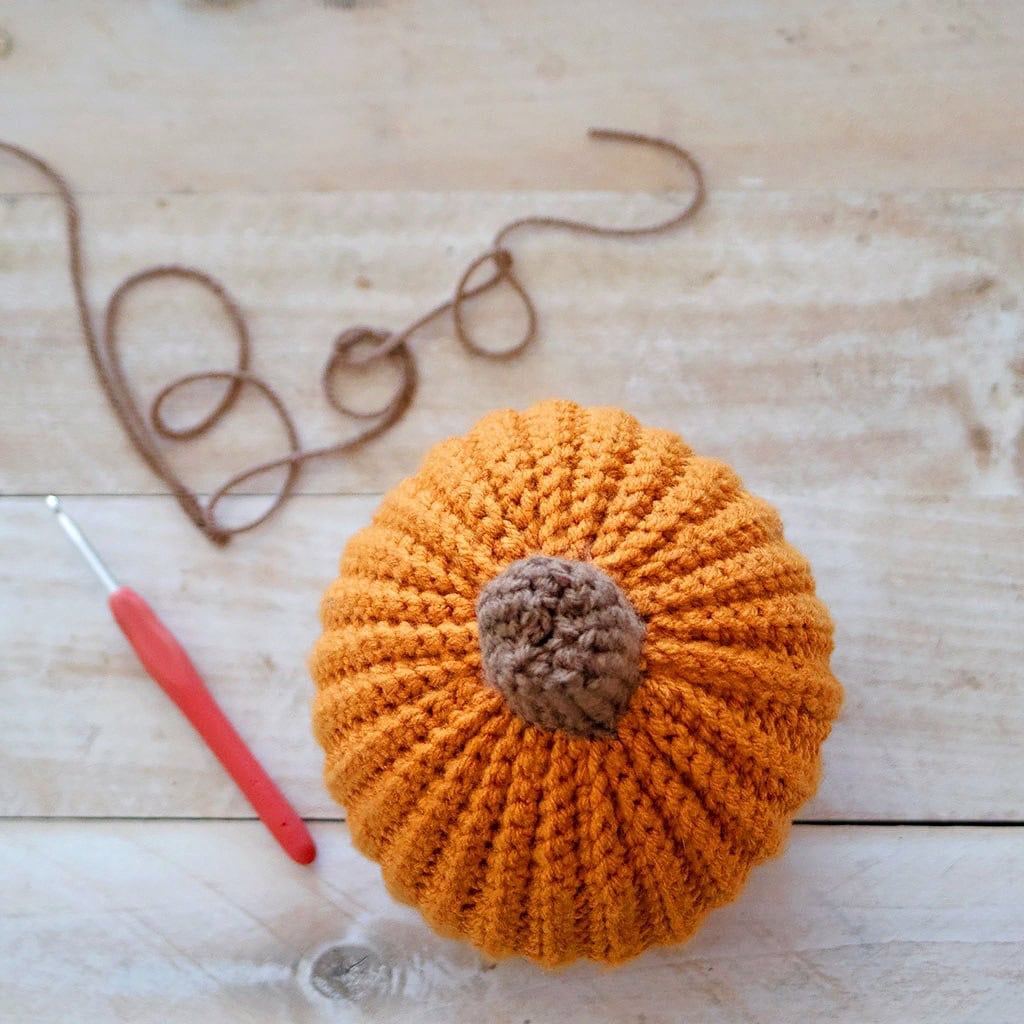
Give your handmade pumpkins a realistic finishing detail with this easy crochet pumpkin stem tutorial. A small stem can completely transform a simple crochet pumpkin, adding texture, dimension, and a cozy autumn feel. Whether you’re making farmhouse fall décor, seasonal gifts, or a pumpkin collection for your home, this quick technique is a simple way to make your projects look polished and complete.
With just a small amount of yarn and basic crochet skills, you can create a sturdy, textured stem that gives your pumpkins a natural handmade look. This easy tutorial is perfect for finishing crochet pumpkins of all sizes and is a great way to use up leftover yarn from your stash. Add your own personal touch by experimenting with different shades of brown, green, or neutral tones to match your fall décor. Once you learn this simple technique, you’ll be able to customize all of your crochet pumpkins with a beautiful finishing detail that makes them feel extra special.
Easy Crochet Pumpkin Stem Tutorial for Beginners
If you’ve ever wondered how to crochet a stem on pumpkins, this beginner-friendly tutorial walks you through the process step by step. Using basic crochet stitches and a small amount of yarn, you can create sturdy stems that attach easily to your crochet pumpkins.
This tutorial is perfect for:
Beginner crocheters looking to add details to their projects
Finishing crochet pumpkins and fall decorations
Using leftover yarn from your stash
Customizing pumpkins in different sizes and colors
The stem is a small detail that makes a big impact and is a fun way to personalize your handmade creations.
Create Cozy Fall Crochet Décor
Crochet pumpkins are one of the most popular fall projects because they are quick to make, beginner-friendly, and add handmade charm to any space. Learning how to crochet a stem on pumpkins gives you the flexibility to finish your pumpkins exactly how you envision them.
Use different shades of brown, tan, or green yarn to create natural-looking stems, or experiment with unique colors for a whimsical fall display. Pair your finished pumpkins with blankets, candles, and other seasonal décor for a cozy autumn look you’ll enjoy year after year.
Looking for free knitting patterns? Browse this full collection of easy knitting patterns you can start today:
50 Free Knitting Patterns You’ll Actually Want to Make (Beginner-Friendly)
31 Free Hat Knitting Patterns for Everyone (Women, Men, Kids & Babies)
Fall Knitting Hub: Cozy Autumn Knitting Patterns for Beginners
Easy Scarf Knitting Patterns Hub: Cozy Beginner-Friendly Scarves You’ll Love to Make
Easy Knitting Patterns Hub: Quick Projects You Can Finish in a Weekend
Easy Knit Hat Hub: Beginner to Intermediate Hat Knitting Patterns (Cozy, Stylish Projects You’ll Actually Wear)
How to Crochet a Stem on Pumpkins (Easy Beginner Tutorial)
✨ Ad-Free Printable Pattern Available! ✨
The ad-free, printable PDF of this pattern is now available for purchase at Shop Gina Michele—perfect for easy, distraction-free stitching.
Looking for more projects? Browse the Knitting Pattern Directory to explore all my knitting patterns in one place.
(As an Amazon Associate, I earn from qualifying purchases)
Supplies needed:
Worsted weight yarn and a size US H crochet hook
(You can use other weights of yarn, as long as the crochet hook corresponds to the weight)
Instructions:
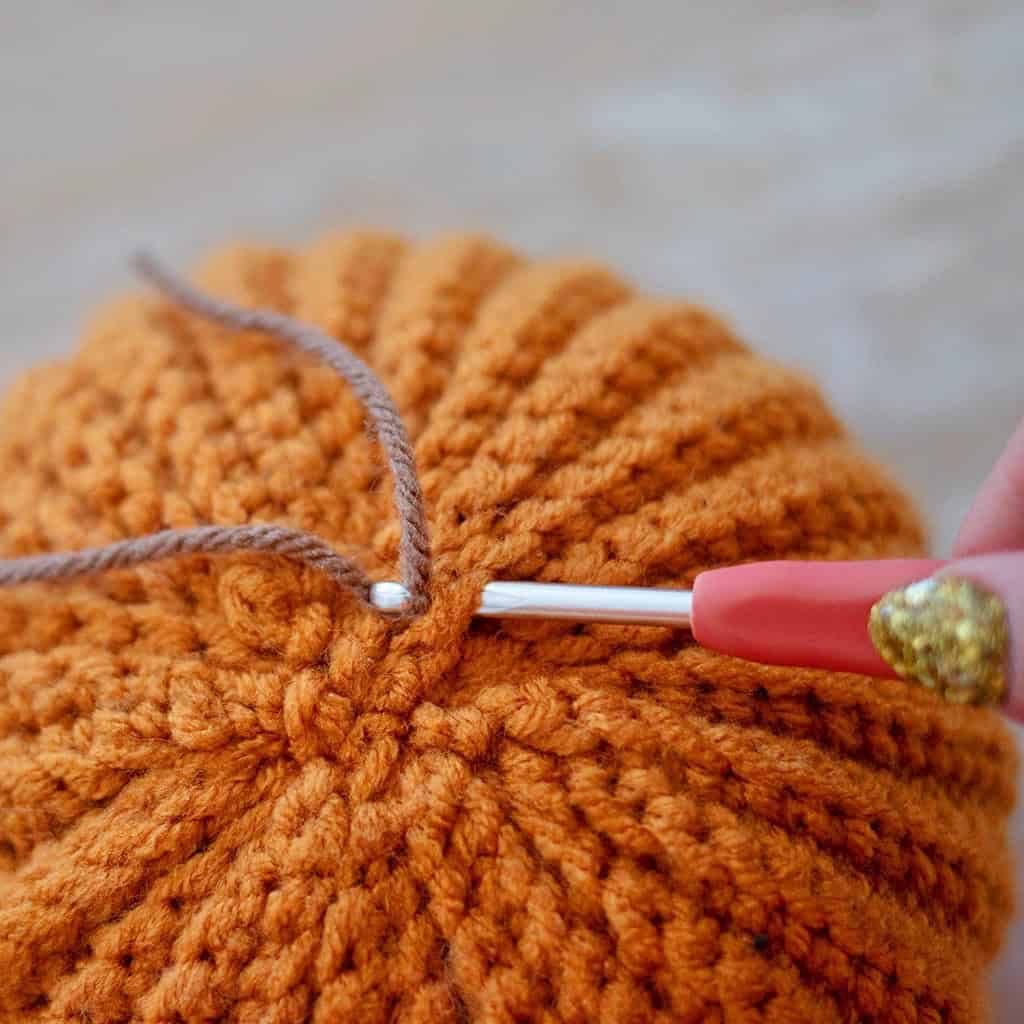
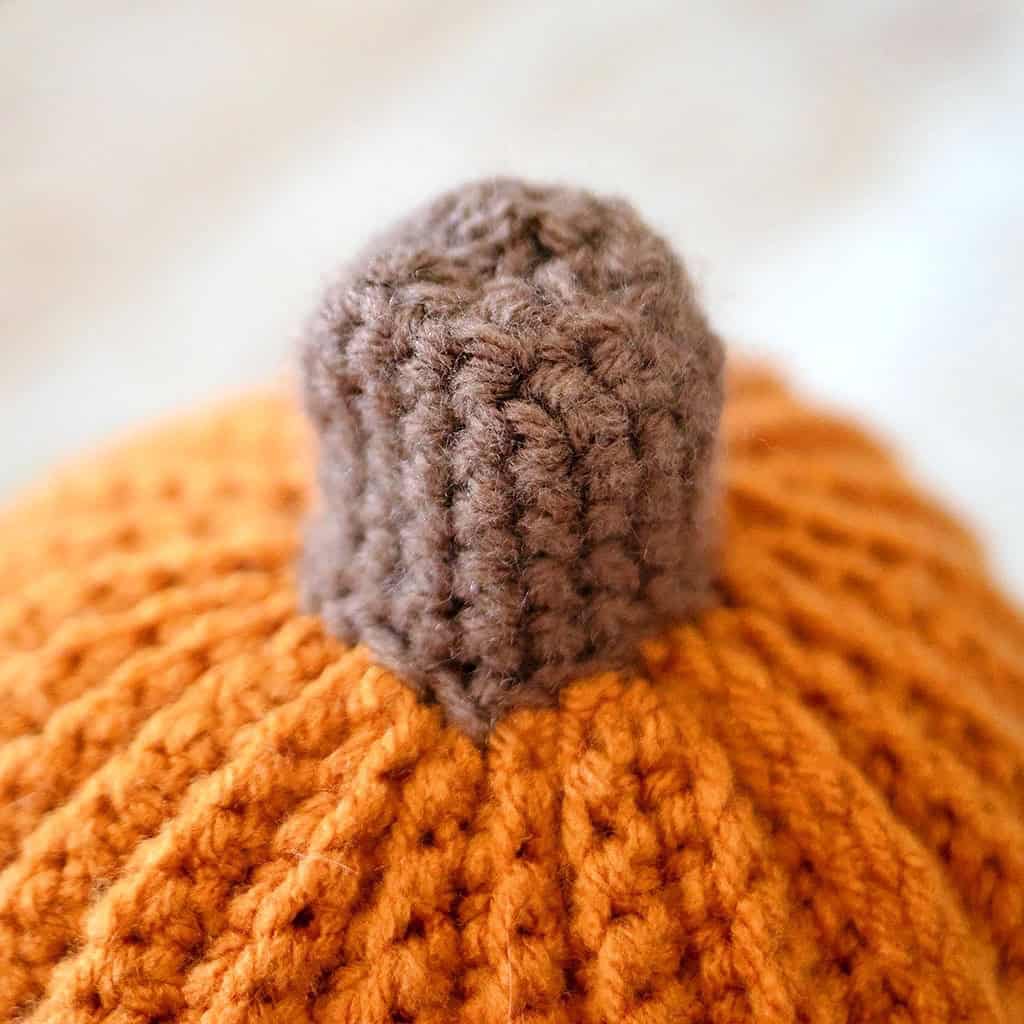
Start by picking up and single crocheting stitches in a ring around the top opening of the pumpkin where the stem will be attached. Work evenly around the circle, spacing your stitches so the base of the stem sits securely and looks neat. Once you have completed the round, join the last stitch to the first stitch with a slip stitch to close the round. This creates a sturdy foundation for building the crochet stem upward.
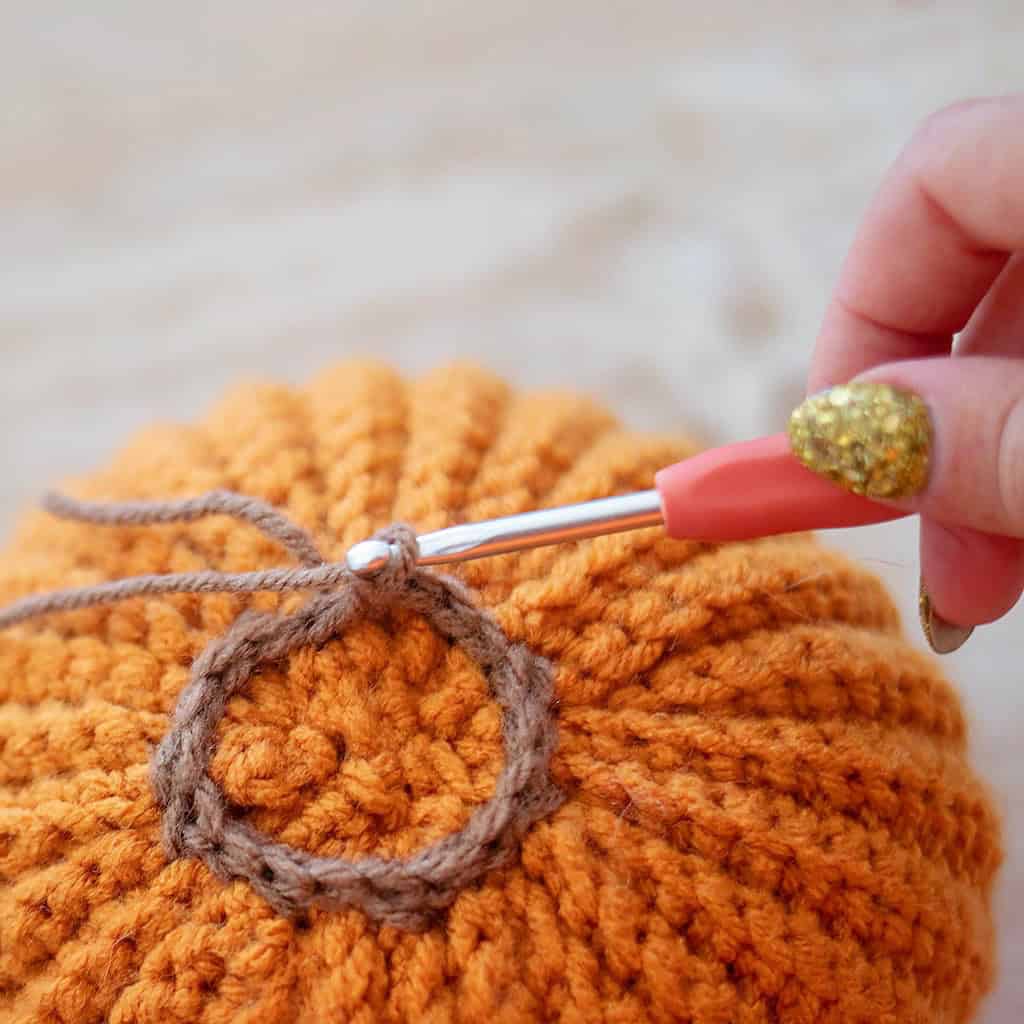
This is what the first finished round should look like.
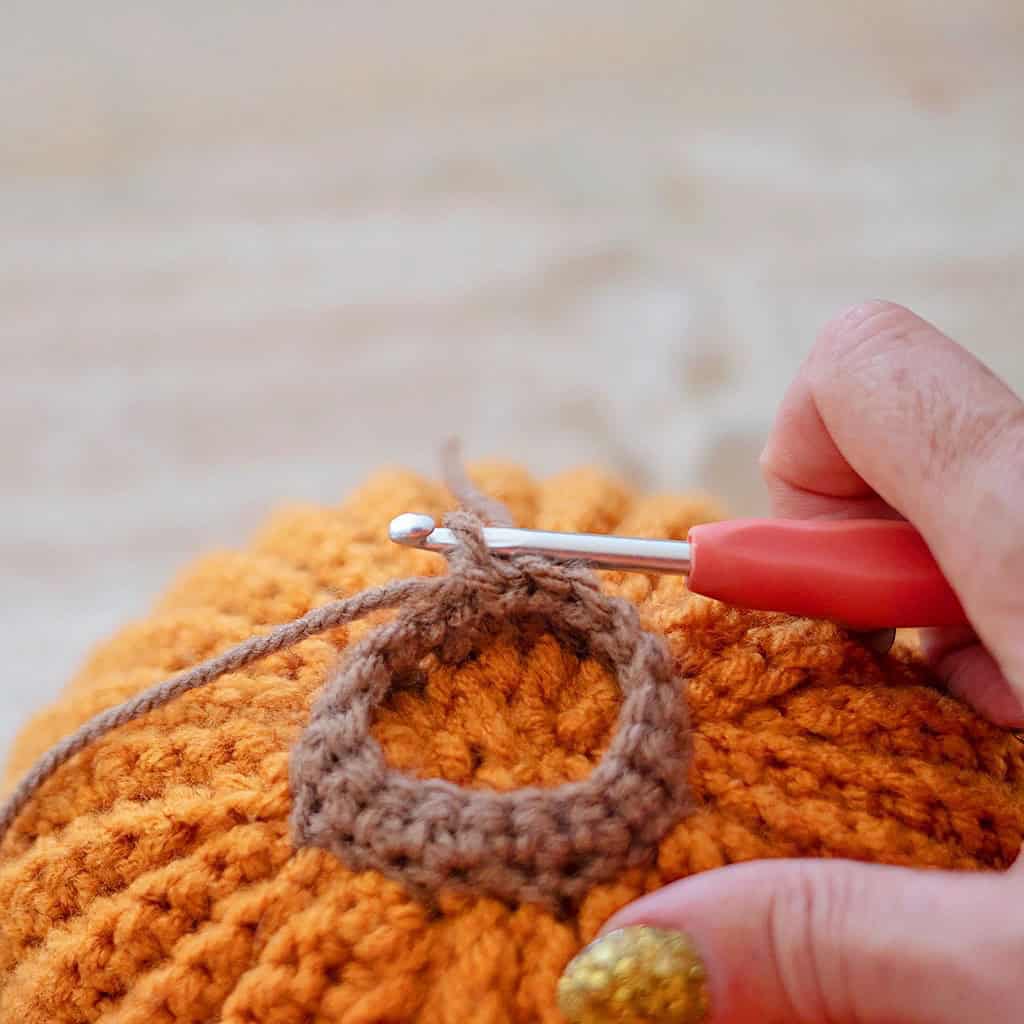
Chain 1. Then single crochet in each stitch around the stem. Join the end of the round to the beginning stitch with a slip stitch to close the round.
Continue working in this same manner, crocheting one round at a time, until the stem reaches your desired height. You can make the stem shorter for small pumpkins or add extra rounds for a taller, more dramatic stem. Adjusting the height is an easy way to customize the look of each pumpkin.
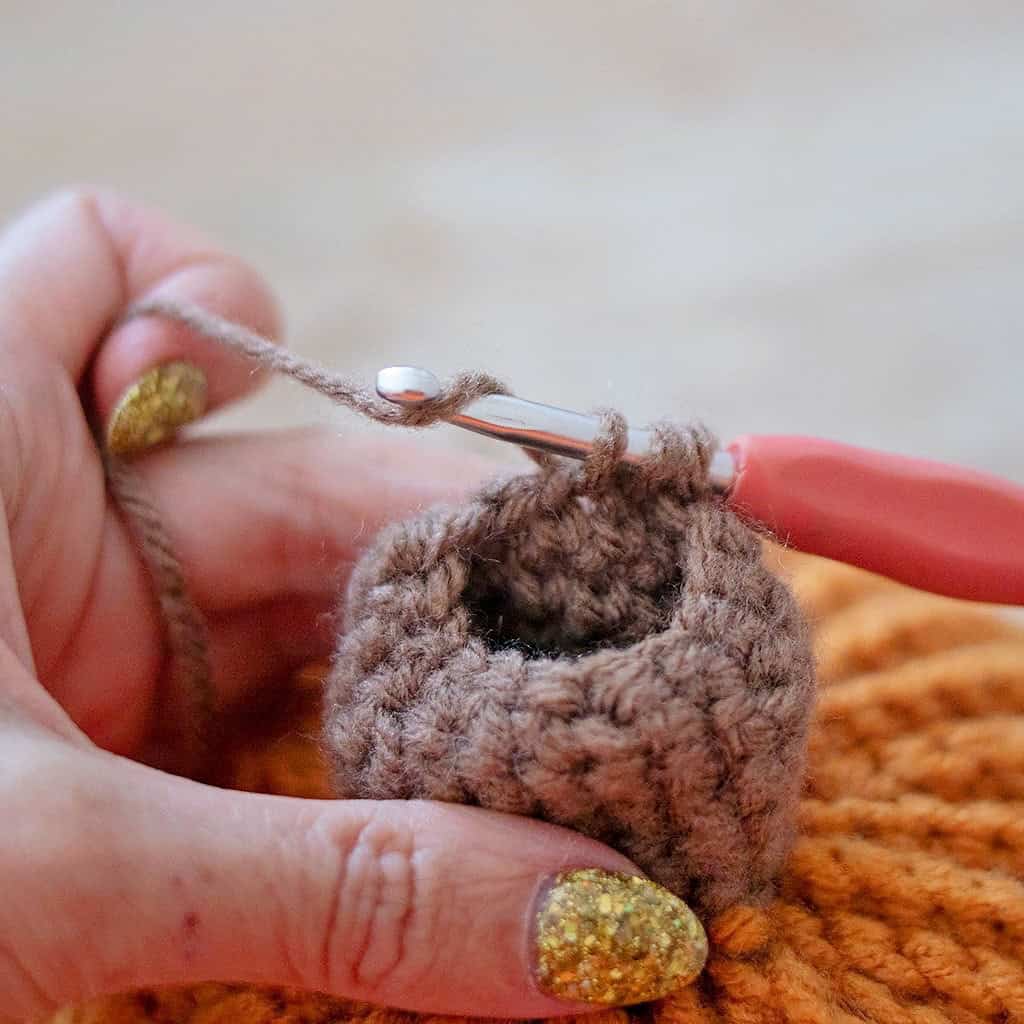
To finish off the stem, begin decreasing by single crocheting 2 stitches together around the round until you are left with only a handful of stitches. Cut the yarn, leaving a long tail, and thread it through a yarn needle. Weave the needle through the remaining stitches, then gently pull the yarn tight to close the top of the stem.
Secure the yarn with a knot, and weave in any remaining ends to create a neat, finished stem. Adjust the shape with your fingers if needed to give the stem a slightly tapered, natural look.
More Easy Knitting and Crochet Pumpkin Patterns
Looking for more handmade fall décor ideas? These easy knitting and crochet pumpkin patterns are perfect for adding cozy autumn charm to your home. From quick beginner projects to textured pumpkins made with chunky yarn, these seasonal designs are a fun way to decorate your mantel, shelves, table, or fall displays.
Explore more pumpkin-inspired projects:
How to Crochet a Pumpkin in the Round (Easy Fall Crochet Pattern for Beginners)
Easy Crochet Pumpkin Topiary Pattern (Beginner-Friendly Fall Decor)
Easy Large Crochet Pumpkin Pattern (Beginner-Friendly Fall Decor)
Flat Knit Cable Pumpkins Pattern (Easy Fall Knitting Decor for Beginners)
Fall Knitting Hub: Cozy Autumn Knitting Patterns for Beginners
Easy Jumbo Pumpkin Knitting Pattern (Flat Knit & Beginner-Friendly)
Easy Jumbo Pumpkin Crochet Pattern (Cozy Super Bulky Fall Decor)
Handmade pumpkins are one of the best fall projects because they are quick, customizable, and can be enjoyed year after year. Pair your finished pumpkins with your favorite autumn decorations, or make a set in different colors and sizes for a cozy farmhouse-inspired display.
Tips for Finishing Your Crochet Pumpkins
Adding a crochet stem is the perfect way to give your handmade pumpkins a more realistic, finished look. Once you’ve completed your pumpkin and attached the stem, there are a few simple details you can add to make each one unique and extra special.
For the best results:
Choose a yarn color that complements your pumpkin shade, such as brown, tan, olive, or cream.
Use a slightly textured yarn to create a more natural-looking stem.
Adjust the stem length and thickness to match different pumpkin sizes.
Secure the stem tightly so it stays in place when your pumpkin is displayed.
Add extra details like crochet leaves, curly vines, or raffia accents for even more fall charm.
Handmade pumpkins are a wonderful way to experiment with different yarn weights, colors, and textures. Try making a collection of pumpkins in various sizes and shades for a cozy autumn display that can be brought out year after year. Whether you’re decorating your home, making gifts, or adding to your seasonal crochet projects, these little finishing touches make a big difference.
More Easy Fall Crochet Patterns
If you enjoyed making these crochet pumpkin details, you’ll love these easy fall crochet patterns for adding handmade warmth to your home and wardrobe. From cozy accessories to seasonal decorations, these beginner-friendly projects are perfect for using up your favorite autumn yarn colors and creating beautiful handmade pieces.
Explore more fall crochet ideas:
Easy Kids Hungry Caterpillar Crochet Hat Pattern (Beginner-Friendly + Fun!)
Crochet Hexagon Sweater Pattern for Women (Easy Cozy Cardigan)
15 Easy Fall Crochet Patterns for Beginners (Cozy & Simple Autumn Projects)
Easy Men’s Basic Crochet Hat Pattern (Crocheted Flat for Beginners)
Beginner Kids Hat Crochet Pattern (Easy Beanie for Boys & Girls)
Easy Cat Bed Crochet Pattern (Cozy DIY Bed for Your Favorite Feline)
Granny Square Pillow Crochet Pattern (Easy & Colorful Home Decor)
Fall is the perfect time to pick up your crochet hook and start a new seasonal project. Whether you’re decorating your home with handmade pumpkins or making cozy accessories to wear, these easy fall crochet patterns are a fun way to enjoy the season one stitch at a time.
Frequently Asked Questions
What yarn should I use for a crochet pumpkin stem?
You can use almost any yarn you have on hand for this crochet pumpkin stem tutorial. Worsted weight yarn is a great choice because it creates a sturdy stem with good texture, but you can also use bulky yarn for a thicker look or smaller yarn for a delicate stem.
Is this crochet pumpkin stem pattern beginner-friendly?
Yes! This tutorial is designed for beginners and uses simple crochet techniques. If you already know basic stitches, you’ll be able to create a stem quickly and easily. It’s a great small project for practicing crochet details.
How do I attach a crochet stem to a pumpkin?
The stem can be attached by sewing it securely to the top of your finished pumpkin using a yarn needle and matching yarn. Make sure to stitch through the base of the stem several times so it stays firmly in place.
Can I use this stem on any crochet pumpkin pattern?
Absolutely! This crochet pumpkin stem tutorial works well with many different pumpkin designs, including pumpkins made with different yarn weights, colors, and textures. You can customize the size of the stem to match small, medium, or large pumpkins.
What other details can I add to my crochet pumpkins?
There are many ways to personalize your pumpkins! Try adding crochet leaves, vines, curly stems, embroidery details, or using different fall-inspired colors. These small touches can make each pumpkin unique.
Learning how to crochet a stem on pumpkins is a simple way to take your handmade fall décor to the next level. While the stem may seem like a small detail, it adds a realistic finishing touch that makes your crochet pumpkins look complete and polished.
This quick tutorial is a fun addition to your fall crochet projects and is perfect for using leftover yarn from your stash. Make a whole pumpkin patch in different colors and sizes, or add stems to pumpkins you’ve already created. Handmade seasonal décor is always special because it brings warmth, personality, and a little creativity into your home.
Grab your crochet hook, choose your favorite autumn yarn colors, and add the perfect finishing touch to your pumpkins.
✨ I’d love to see what you’re making! ✨
If you’ve tried one of my knitting patterns, crochet projects, DIYs, or recipes, share your finished project on Instagram and tag me so I can see it 💛
There’s nothing better than seeing your creations come to life—from cozy knits to delicious recipes and everything in between. It truly makes my day!
Tag me @ginamicheleny so I can share you.
Happy making!