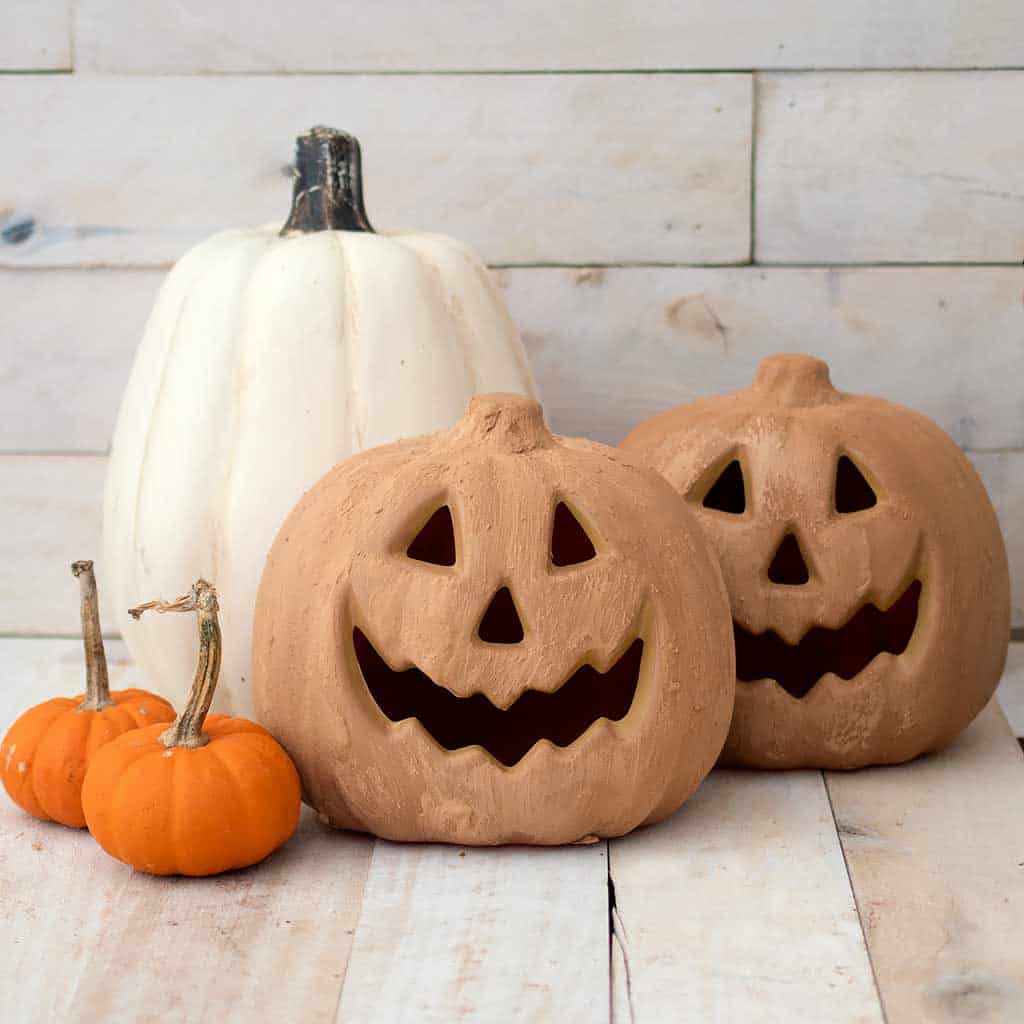
How to Paint Faux Terracotta Pumpkins
Embrace the warmth of autumn and add a touch of rustic charm to your decor with my step-by-step guide on how to paint faux terracotta pumpkins.
As the autumn breeze sweeps in, bringing with it the promise of cozy sweaters and pumpkin-spiced everything, it’s also the perfect time to refresh your seasonal decor. Plastic pumpkins have long been a staple of fall adornment, but why settle for their ordinary appearance when you can transform them into elegant, faux terracotta beauties?
In this blog post, I’ll unveil the secrets to upgrading those ubiquitous plastic pumpkins with a faux terracotta paint finish. With a few simple steps and a bit of creativity, you’ll breathe new life into your fall decor, adding warmth and sophistication to your seasonal space. Get ready to embark on a DIY journey that will leave your home looking like it’s straight out of a rustic autumn dream.
KEEP IN TOUCH! FOR MORE INSPIRATIONS, TUTORIALS, AND FREE KNITTING PATTERNS, SIGN UP FOR MY WEEKLY NEWSLETTER:

Adding baking soda to paint can have several effects on the paint and the finished painted surface, depending on how it’s used and the specific project. Here are some common effects of adding baking soda to paint:
- Texture and Thickness: Baking soda can be used to increase the texture and thickness of paint. When mixed into the paint, it creates a gritty or grainy texture. This effect is often used for artistic purposes, such as creating textured or faux finishes on walls or surfaces. It can add depth and interest to paintings or decorative projects.
- Matte Finish: Baking soda is a common ingredient in homemade chalk paint recipes. When added to regular latex or acrylic paint, it can give the painted surface a matte, chalky finish. This finish is popular for furniture restoration and DIY projects, especially when a vintage or shabby chic look is desired.
- Distressing: Baking soda can be used in conjunction with paint to distress furniture or other surfaces. By applying a layer of paint mixed with baking soda and then sanding it when dry, you can create a weathered, distressed appearance. The baking soda can help the paint to sand away more easily in certain areas, revealing the underlying surface.
- Drying Time: The addition of baking soda to paint may alter its drying time. Thicker paint with baking soda may take longer to dry compared to regular paint. This extended drying time can be advantageous for certain painting techniques, allowing more time for blending or creating specific effects.
- Adhesion: In general, when used in moderation, baking soda should not significantly affect the adhesion of the paint to surfaces. However, excessive amounts of baking soda can weaken the paint’s adhesion, potentially leading to peeling or flaking. It’s crucial to follow recommended proportions and guidelines when adding baking soda to paint to ensure proper adhesion.
- Color Alteration: Depending on the type of paint and the amount of baking soda added, there may be a slight alteration in the color or opacity of the paint. This effect can be used creatively to achieve unique color variations or tonal changes in your painting or decorating project.
How to Paint Faux Terracotta Pumpkins
Supplies needed:
Inexpensive plastic pumpkins
Neutral colored acrylic paint
Baking soda
Paintbrush
Directions:

This terracotta paint technique will work on any plastic of foam pumpkin.

Give the pumpkin a few coats of paint to cover up the original color. Let the paint dry in between each coat.

Mix 2 tsp of baking soda along with the acrylic paint. If the paint becomes too thick to brush on, add more paint. Paint on the baking soda paint and let dry. I only needed to apply one coat, but you can always do more.
As you put the finishing touches on your faux terracotta pumpkins and step back to admire your handiwork, take a moment to savor the satisfaction that comes from transforming humble plastic pumpkins into stunning works of art. These faux terracotta beauties are not only a testament to your creativity but also a charming addition to your fall decor. With their rustic allure and timeless appeal, they’ll infuse your home with the warmth and spirit of autumn.
I hope this tutorial has inspired you to embark on more DIY adventures and continue to craft a home that reflects your unique style and personality. Happy decorating, and may your fall be filled with the colors and comforts of the season!
Looking for more posts like How to Paint Faux Terracotta Pumpkins?
16 Free Halloween Knitting Patterns
Jack-O-Lantern Costume- Easy to sew!
I love seeing your finished projects! If you enjoyed How to Paint Faux Terracotta Pumpkins or any of my other Halloween crafts, I’d love to see yours on Instagram, just tag me @ginamicheleblog. Happy crafting!
Like what you see here? Don’t forget to visit my other blogs: