How to Make a Macrame Leaf
Learn how to make a macrame leaf with this beginner-friendly DIY tutorial. Step-by-step instructions, tips, and styling ideas for the perfect boho leaf.
Macrame has made a huge comeback in home décor, and it’s easy to see why. The soft textures, neutral colors, and relaxed boho vibe fit perfectly with almost any style of decorating. If you’ve been wanting to try macrame but feel intimidated by complicated patterns, a macrame leaf is the perfect project to start with. It’s quick, beginner-friendly, and so satisfying to make!
Macrame leaves are incredibly versatile – you can make just one as a simple charm, or create several and turn them into a wall hanging, garland, or table centerpiece. You can keep them natural for a soft, earthy look, or dye them to match your favorite colors. And since they only use a few basic knots, they’re a great project to learn the fundamentals of macrame without feeling overwhelmed.
In this tutorial, I’ll walk you through exactly how to make a macrame leaf step by step, share tips for getting that soft, fluffy fringe, and give you fun ideas for displaying your finished piece. Whether you want to add a boho touch to your home décor or just try something new on a cozy afternoon, this is a craft you’re going to love.
KEEP IN TOUCH! FOR MORE INSPIRATIONS, TUTORIALS, AND FREE KNITTING PATTERNS, SIGN UP FOR MY WEEKLY NEWSLETTER:

How to Make a Macrame Leaf
Supplies You’ll Need
You don’t need much to get started. Gather:
- Macrame cord (3–5 mm works great)
- Scissors
- Comb or wire brush
- Fabric stiffener or spray starch (optional but helps hold its shape)
Step-by-Step Instructions: How to Make a Macrame Leaf
1. Cut Your Cords
Cut the macrame cord into the following lengths: (approximately inches 9 long): 1 – 20 inch piece (this will be the base of the leaf), 10 – 12 inch pieces, 10 – 10 inch pieces, 10 – 8 inch pieces
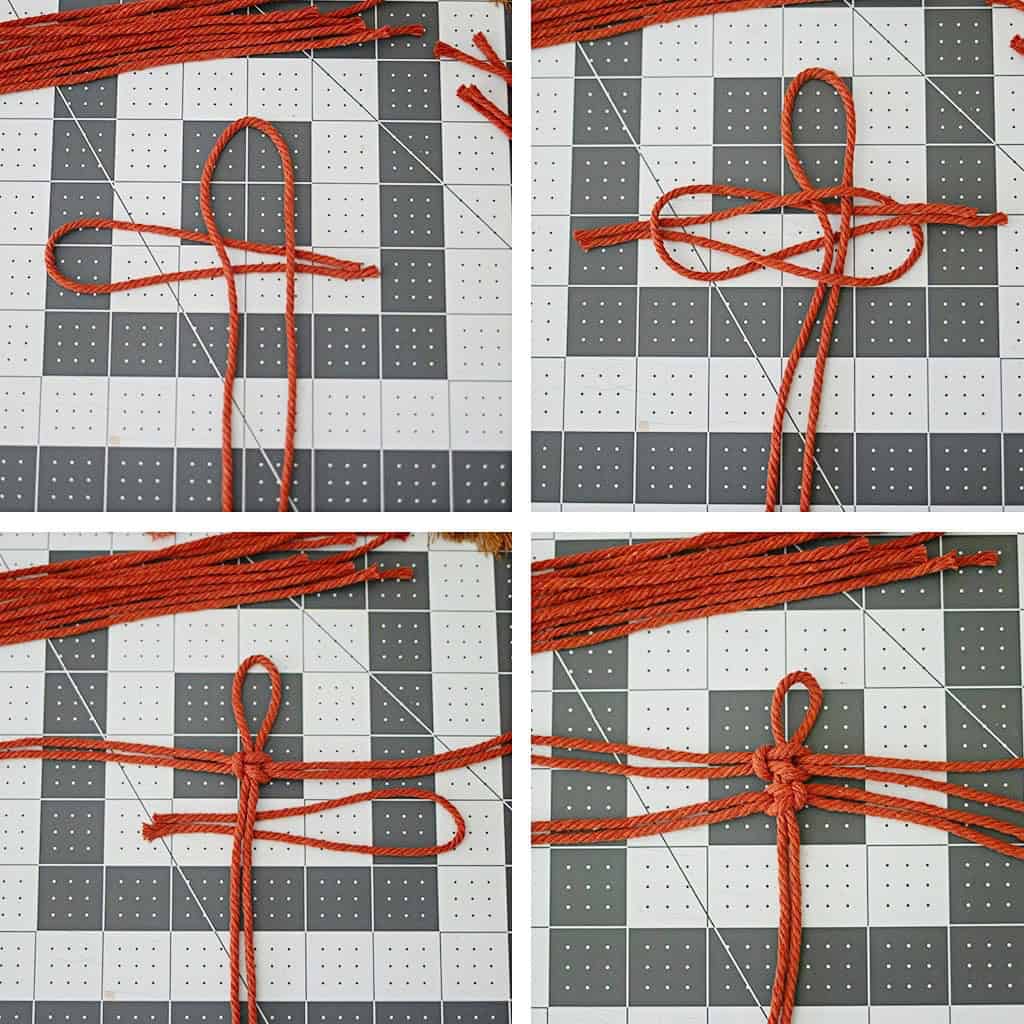
2. Make Your Knots
Fold the longest piece in half. This will be the spine of the feather that all the other cords get knotted onto. You’re going to start with the 10 inch cords, then the 12 inch and work down to the 8 inch.
Take two 10 inch cords, fold them in half, and place one loop under the center cord and one loop over it. Pull the ends through the loops and tighten – this forms a square knot around the center cord.
Repeat this process, stacking knots along the center cord until no cords remain.

3. Pick the Cords
Use your fingers to pick apart and unravel the cords. This will make them easier to brush.

4. Comb and Fluff
Use your comb or brush to gently comb out the ends of the cords until they’re soft and fluffy. This is where the magic happens – your project will start looking like a real leaf!

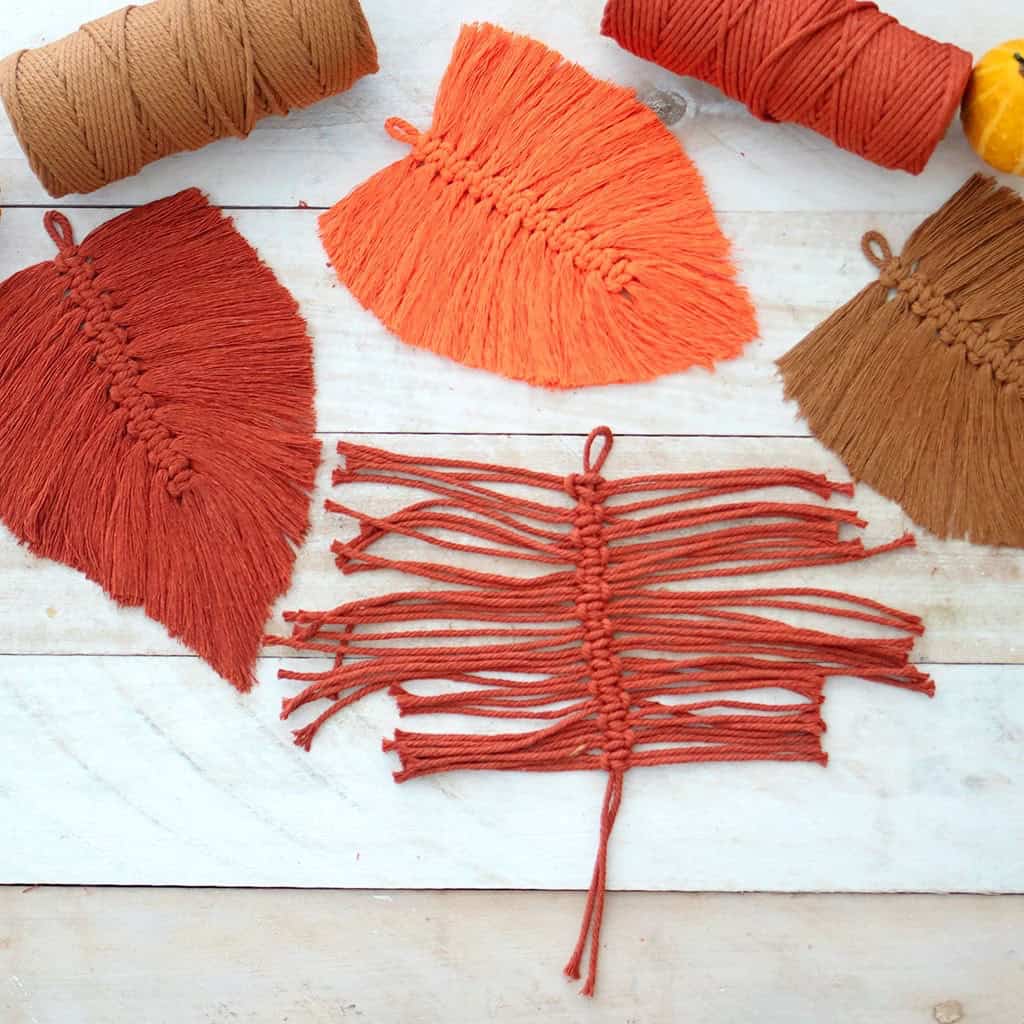
4. Trim into Shape
With sharp scissors, carefully trim the edges into a symmetrical leaf shape.

5. Stiffen (Optional)
For a crisp look, spray your macrame leaf with fabric stiffener or starch and let it dry flat.
Macrame leaves are quick, relaxing, and the perfect scrap-busting project if you have leftover cord. Plus, they make great gifts or additions to handmade décor. Once you master one leaf, you can play with sizes, colors, and even dip-dye for a unique effect.
Making a macrame leaf is a simple, creative project that anyone can do. With just a few knots and a bit of trimming, you’ll have a beautiful piece of handmade décor that looks amazing anywhere.
Looking for more Macrame Projects like these DIY Macrame Leaves?
How to Make a Macrame Yoga Mat Strap
How to Make Twine from Fabric Scraps
I love seeing your finished projects! If you enjoyed making this post How to Make Macrame Feathers, or any of my other easy craft projects, I’d love to see yours on Instagram, just tag me @ginamicheleny. Happy crafting!