How to Sew an Envelope Pillow Cover (Easy Beginner Tutorial + No Zipper Needed)
Learn how to sew an envelope pillow cover the easy way. This beginner-friendly sewing tutorial uses simple steps and no zipper—perfect for fast home decor updates.

If you want to instantly refresh your space without spending a fortune, this envelope pillow cover tutorial is one of the easiest DIY projects you can make.
Seriously—this is one of those projects that looks high-end when it’s finished, but takes almost no time to complete.
In fact…
👉 You can make one of these pillows in about 15 minutes.
No zippers. No complicated sewing techniques. Just simple straight seams and a clever envelope-style back that lets you easily remove the pillow insert.
If you’re new to sewing or just want a quick win, this is the perfect place to start.
Why You’ll Love This Envelope Pillow Cover
Envelope pillows are one of the most beginner-friendly sewing projects—and for good reason.
They’re:
Fast to make|
Budget-friendly
Easy to customize
Machine washable
Instead of using a zipper, this design features overlapping fabric in the back so you can slide the pillow insert in and out easily.
That means:
✔ No hardware
✔ No stress
✔ Clean, professional finish
What You’ll Need for How to Sew an Envelope Pillow
Upholstery fabric or medium-weight fabric
Pillow insert
Matching thread
Sewing machine
Pins or clips
Iron
Tip: Upholstery fabric gives the most polished look because it holds its shape well and is more durable.
Looking for More Easy Sewing Projects?
How to Sew a Bowl from Fabric Scraps
How to Sew Cloth Napkins with Mitered Corners
Free Kids T-Shirt Sewing Pattern (Easy Beginner Tee in Multiple Sizes)
How to Make a Sewing Pattern out of Existing Shorts

How to Sew an Envelope Pillow Cover (Easy Beginner Tutorial + No Zipper Needed)
(As an Amazon associate, I earn from qualifying purchases)

Pattern pieces:
Cut 1 piece of fabric measuring 19 x 19 inches for the front of the pillow cover. Then, cut 2 pieces measuring 19 x 13 inches for the back panels. These overlapping back pieces create the envelope-style opening, making it easy to insert and remove the pillow form without using a zipper.
Take the 2 back pieces and place them wrong side up on your ironing board. Along one of the 19-inch edges on each piece, fold the fabric over 1/2 inch and press with a hot iron. Fold the edge over once more by another 1/2 inch to create a clean finished hem, then press again carefully to hold the fold in place. This double-fold hem helps prevent fraying and gives the back opening a polished, professional look. Once pressed, sew a straight stitch along the folded edge on both back pieces.

On both back pieces, sew a straight stitch along the folded edge to secure the hem in place. Stitch close to the inner folded edge for a clean, finished look. This simple step keeps the fabric from fraying over time and gives the envelope opening a neat, professional finish.
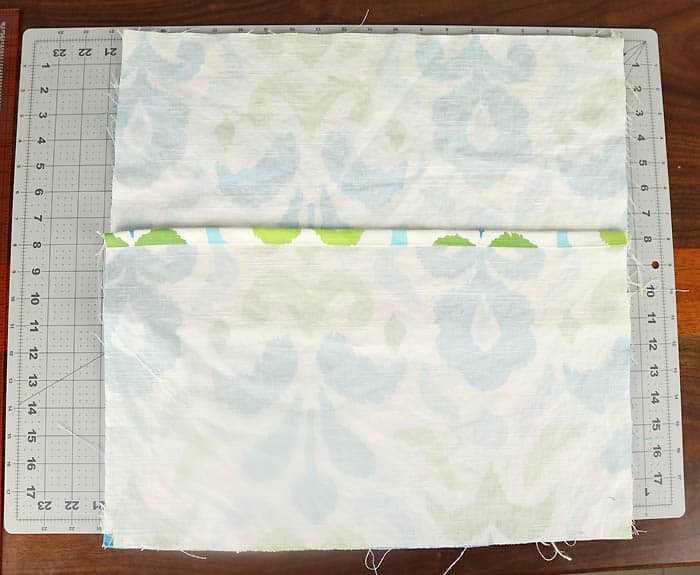
Lay the pillow front piece flat with the right side of the fabric facing up. Next, place the two back pieces on top with the right sides facing down, overlapping the finished hemmed edges in the center to create the envelope opening. Adjust the pieces until all four outer edges line up evenly. Pin or clip the layers together around the edges to help keep everything in place while sewing.
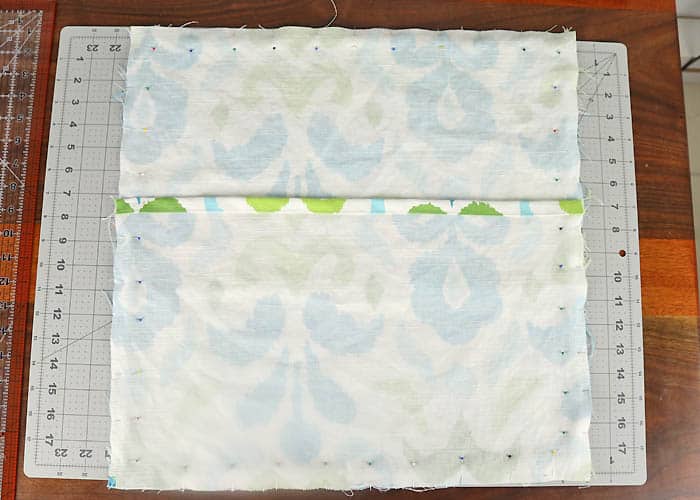
Once all the edges are lined up evenly, pin or clip the layers together around all four sides of the pillow cover. Sew around the entire outer edge using a 1/2 inch seam allowance, backstitching at the beginning and end for extra durability. Be sure to stitch through all layers, including the overlapping back pieces, to securely hold the envelope pillow cover together.

Trim the excess fabric from all four corners, cutting diagonally across each corner close to the stitching line. Be careful not to cut through your seams. This helps reduce bulk and creates sharper, more pointed corners when the pillow cover is turned right side out.
Turn the pillow cover right side out through the envelope opening and gently push out the corners using your fingers or a blunt tool like a chopstick or knitting needle. Insert your pillow form through the back opening, fluff the pillow, and your envelope pillow cover is finished and ready to enjoy!
No complicated steps. No confusing instructions. Just a simple project that delivers a big visual impact.

Tips for a Professional Finish
Use thicker fabric
Heavier fabrics create a more structured, high-end look.
Press your seams
This makes a huge difference in how polished your pillow looks.
Make it snug
A slightly tight fit keeps your pillow from looking saggy.
Easy Ways to Customize Your Pillow
Once you make one, you’ll want to make more—and it’s easy to switch things up:
Use seasonal fabrics
Try neutral tones for a modern look
Mix textures like linen or velvet
Add trim or piping
This is a great way to update your space for:
Fall
Holidays
Spring refreshes
Perfect for Beginners
This envelope pillow is often recommended as a first sewing project because:
It uses only straight stitches
It teaches basic construction
It builds confidence quickly
Even if you’ve never used a sewing machine before, you can absolutely make this.
More Easy DIY Projects You’ll Love
If you enjoyed this project, here are a few more beginner-friendly ideas:
👉 DIY Cedar Window Boxes: Easy Custom Planters That Make Your House Look Instantly Prettier
👉 DIY Trellis (Easy, Budget-Friendly Garden Upgrade That Looks Expensive)
👉 How to Build an Easy Kayak Rack (Cheap DIY That Holds Multiple Kayaks)
👉 Hurdle Stitch Pillow Knitting Pattern (Easy Beginner Pillow You Can Make This Weekend)
Looking for more?
👉 Free Knitting Patterns Directory
Why This Project Works So Well
This isn’t just a beginner project—it’s a repeatable, high-impact DIY.
You can:
Make multiple covers quickly
Swap them out seasonally
Refresh your home without buying new decor
And because there’s no zipper, it stays simple every time.

FAQs for How to Sew an Envelope Pillow
Is an envelope pillow cover good for beginners?
Yes! This is one of the best beginner sewing projects you can try. It only requires straight stitches and simple folding, so it’s perfect if you’re just learning how to use a sewing machine. Even if you’ve never sewn before, this project is very approachable and easy to follow.
Do I need a zipper for this pillow cover?
No—that’s the best part of an envelope pillow cover. Instead of a zipper, the back uses overlapping fabric panels that create an opening. This makes it easy to insert and remove the pillow form without any hardware or complicated sewing techniques.
What size fabric should I cut?
For an 18” pillow insert, cut one front piece at 19” x 19” and two back pieces at 19” x 13”. The extra inch allows for seam allowances and helps create a snug, professional-looking fit.
What type of fabric works best?
Medium-weight fabrics like upholstery fabric, cotton canvas, or linen work best because they hold their shape well and give the pillow a more polished look. Lightweight fabrics can work too, but may feel softer and less structured.
How long does it take to make?
Most people can complete one envelope pillow cover in about 15–20 minutes. Once you’ve made one, the process gets even faster, making it easy to create multiple covers in a short amount of time.
Can I wash the pillow cover?
Yes! Since there’s no zipper, the envelope opening makes it easy to remove the cover and wash it. Just be sure to prewash your fabric before sewing to prevent shrinking later.
This How to Sew an Envelope Pillow post is proof that you don’t need advanced sewing skills to create something beautiful.
It’s simple, fast, and incredibly satisfying—and once you make one, you’ll realize how easy it is to completely transform a space with just a few pieces of fabric.
Whether you’re decorating your living room, bedroom, or even a cozy reading nook, these pillows are an easy win.
And the best part?
👉 You can make them in less time than it takes to shop for them.
✨ I’d love to see what you’re making! ✨
If you’ve tried one of my knitting patterns, crochet projects, DIYs, or recipes, share your finished project on Instagram and tag me so I can see it 💛
There’s nothing better than seeing your creations come to life—from cozy knits to delicious recipes and everything in between. It truly makes my day!
Tag me @ginamicheleny so I can share your work and cheer you on!
Happy Making!